
You are twelve hours into a complex project when that dreaded rhythmic clicking starts, and suddenly, your nozzle is printing nothing but thin air. It is the nightmare scenario for every maker: a failed print caused by an extruder that has simply given up. Mastering 3D printer extruder repair is the only way to move past the guesswork of identifying if you have a stubborn jam, worn-out drive gears, or a failing stepper motor. We understand the frustration of losing a long print and the fear of damaging delicate ribbon cables while trying to fix it yourself.
This 2026 guide provides the roadmap you need to diagnose failure points and restore your machine to professional-grade precision. You will learn how to clear carbonized clogs, optimize tensioners, and select the best replacement parts to keep in your Canadian workshop. We are here to help you realize consistent layers and reliable performance. By following these steps, you can save your hardware and keep your creative projects on track without the stress of constant mechanical failure.
Key Takeaways
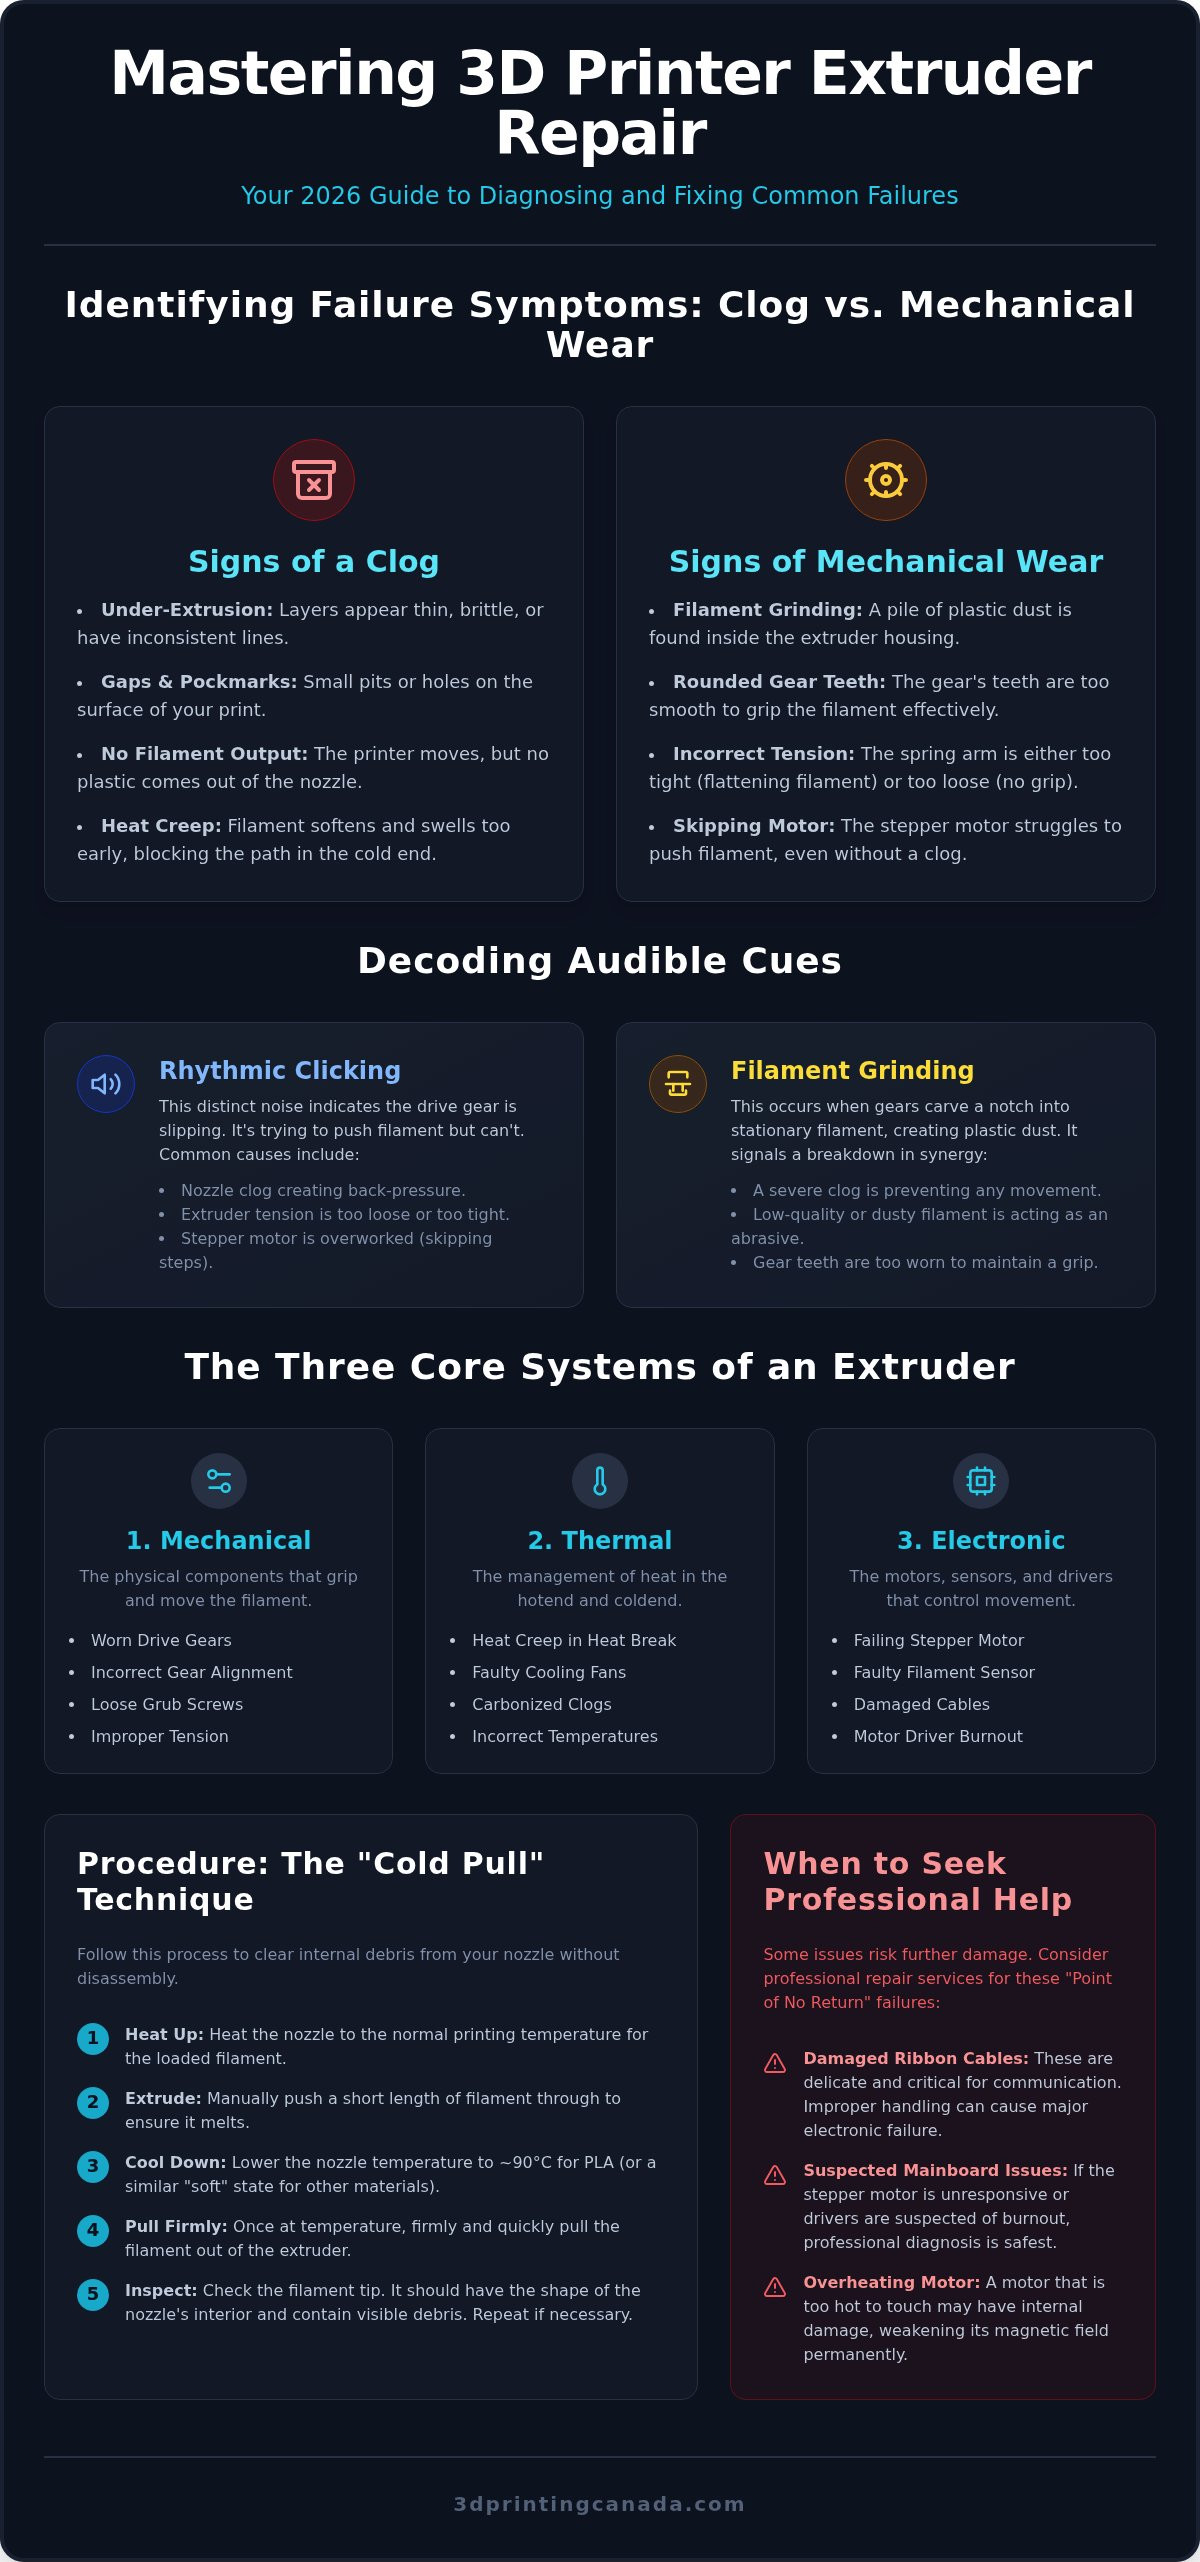
- Learn to distinguish between a simple nozzle clog and deep-seated mechanical wear by identifying audible cues like clicking and grinding.
- Master the three core systems of 3D printer extruder repair to troubleshoot gears, thermal breaks, and electronics with confidence.
- Build a professional-grade toolkit with essential hex keys and cleaning filaments to maintain your printer's precision and longevity.
- Follow a safe, step-by-step process for performing the "Cold Pull" technique to clear internal debris without damaging delicate components.
- Recognize the "Point of No Return" failures where professional repair services save you time and protect your hardware from further damage.
Identifying Extruder Failure Symptoms: Is it a Clog or Mechanical Wear?
Think of the extruder as the heart of your machine. It is the critical assembly that drives the entire Fused filament fabrication (FFF) process by feeding material at precise speeds and volumes. When the heart falters, the rest of the printer cannot compensate. You might notice your printer running silently, but no plastic is leaving the nozzle. Other times, the motor might be completely still, refusing to turn despite the software commands. These are the red flags that signal a need for 3D printer extruder repair.
Visual cues on your finished parts often tell the story before you even hear a sound. Under-extrusion is a classic sign; it leaves your layers looking thin, brittle, or full of gaps. You might see "pockmarks" or small pits on the surface where the filament flow momentarily stopped. Heat creep is a primary cause of extruder failure in long prints, as it causes filament to soften and swell prematurely inside the cold end of the assembly.
The Infamous Clicking Noise
The rhythmic clicking sound is a common frustration, but it doesn't always mean you have a nozzle clog. While a blockage creates back-pressure that causes the gears to slip, the issue could be purely mechanical. If the spring tension on your extruder arm is too tight, it can flatten the filament until it's too wide to enter the Bowden tube. Conversely, if it's too loose, the gears won't get enough "bite" to push the material forward. This lack of grip leads to the gear slipping over the plastic, creating that distinct noise.
Sometimes, the clicking indicates that your stepper motor is skipping steps. This happens when the motor is overworked, often due to printing too fast or at temperatures that are too low for the material. If you've ruled out a clog and the tension is correct, the motor itself might be struggling to overcome the resistance in the filament path. Diagnosing this early prevents you from burning out the motor driver on your mainboard, making it a vital part of 3D printer extruder repair.
Grinding and Filament Debris
If you open your extruder housing and find a pile of colourful plastic dust, you're dealing with filament grinding. This "shaving" effect occurs when the drive gears spin against a stationary piece of filament, carving a notch into the plastic. It's a clear sign that the mechanical synergy has broken down. Using low-quality or dusty filament can accelerate this wear, as debris acts like an abrasive on the gear teeth, slowly stripping away their ability to function.
Cleaning the drive gears should be your first step in any maintenance routine. Use a small brush to remove plastic buildup from the teeth to restore their grip. If the teeth look rounded or smooth, they won't be able to grab the filament regardless of how much tension you apply. In these cases, a 3D printer extruder repair will likely require a hardware swap for hardened steel gears, especially if you frequently print abrasive materials like carbon fibre or wood-filled filaments.
The Anatomy of a Repair: Diagnosing Gears, Motors, and Sensors
To perform a successful 3D printer extruder repair, you have to look beyond the nozzle. Think of the extruder as a trifecta of systems working in perfect harmony: mechanical, thermal, and electronic. If one fails, the whole process stalls. Mechanical issues usually involve the gears that grip the filament. Thermal issues centre on the heat break and cooling fans. Electronic issues involve the stepper motor and sensors that coordinate the movement. By isolating which system is failing, you can avoid replacing parts that are still perfectly functional.
Check your drive gears for "rounding" first. Over time, the sharp teeth that bite into the filament wear down. This is common if you use abrasive materials. Once they lose their edge, they can't provide the necessary torque, leading to slips. Don't overlook the filament sensor either. Small bits of debris or plastic dust can lodge inside the sensor housing. This triggers a false "out of filament" error that kills your print mid-way. Additionally, realize that stepper motors can lose torque if they've been subjected to excessive internal heat. If the motor feels too hot to touch, it might be suffering from internal damage that weakens its magnetic field and prevents consistent extrusion.
Inspecting the Drive Gear Assembly
Start by checking the gear alignment on the motor shaft. If the grub screw has loosened, the gear might shift. This causes the filament to miss the teeth entirely or rub against the housing. While stainless steel gears are standard on many entry-level machines, they wear quickly when faced with tough filaments. Hardened steel is the gold standard for longevity and reliability. Also, spin the idler bearing by hand. It should move freely without any grit or resistance. If it's stuck or sluggish, the motor will struggle to push filament through the path. This mechanical resistance mimics a nozzle clog, leading to the clicking sounds we discussed in the previous section.
Thermal Management and Heat Creep
A failing cooling fan is often the silent killer of extruders. If the fan isn't spinning at full speed, heat travels up the throat of the hotend. This causes filament to soften before it reaches the melt zone, a phenomenon known as heat creep. While it looks like a mechanical jam, it's actually a cooling failure. This is especially common with PETG. It requires higher temperatures and can soften easily if the thermal barrier isn't maintained. If your hardware is beyond a simple cleaning, you can find high-quality Bambu Lab accessories and replacement parts to get your rig back in action. Maintaining this thermal boundary is just as important as keeping your gears clean for a successful 3D printer extruder repair.
The Repair Toolkit: Essential Tools and Replacement Parts
Successful 3D printer extruder repair requires more than just patience; it demands a specific set of tools designed for precision. Relying on generic home tools can lead to stripped screws or damaged sensors. Your kit should start with a high-quality set of metric hex keys. Almost every component in a modern extruder uses these fasteners. Precision tweezers are essential. They allow you to reach into tight housings to pluck out snapped filament segments, while a brass cleaning brush lets you scrub drive gears without damaging their profile. These tools provide the control needed to handle delicate assemblies without causing further harm.
When it comes to clearing the filament path, you have two main options. A physical needle is a quick fix for a blocked nozzle tip, but it often just pushes the debris around. Using specialized cleaning filament is a much more thorough method. This material is designed to grab onto residual plastic and burnt particles, pulling them out as you purge the system. For those running high-performance machines, keeping a stock of Bambu Lab accessories like spare drive gears and filament cutters is a smart move. Having these on hand ensures that a simple hardware failure doesn't turn into a week of downtime while you wait for shipping.
Choosing High-Quality Replacement Parts
While generic third-party kits are tempting because of their low cost, OEM parts are generally the safer bet. They ensure the tolerances and thermal properties match your printer's firmware settings exactly. If you frequently print abrasive filaments like carbon fibre or glow-in-the-dark PLA, upgrading to hardened steel gears is non-negotiable. Stainless steel gears will wear down within a few hundred hours of printing these materials. Always double-check your heater block and thermistor specifications before ordering; you can visit Adage Components to access technical data sheets for electronic components. A mismatched thermistor can lead to "thermal runaway" errors, which are both frustrating and potentially dangerous for your workshop.
Proper lubrication keeps the mechanical side of your extruder running smoothly. Apply a small amount of synthetic, plastic-safe grease only to the internal gear teeth where they mesh together. Never let lubricant touch the filament path or the drive gears that grip the plastic. This will cause immediate slipping and print failure. For hobbyists, a quick inspection every fifty hours of printing is usually enough. If you are running a 24/7 production environment, a weekly teardown and cleaning are necessary to prevent dust buildup. Use a lubricant that won't degrade plastic or rubber components over time to ensure your housing remains structurally sound.
Step-by-Step Guide to Clearing Clogs and Replacing Gears
Before you begin any 3D printer extruder repair, safety is your top priority. Power down your machine, unplug the power cable from the wall, and allow the hotend to cool completely to room temperature. Working on a hot machine risks severe burns and can lead to electrical shorts if a tool touches a live heater cartridge wire. Once the machine is safe to handle, clear a clean space on your workbench to organize the small screws and springs you are about to remove. Losing a single M3 fastener can stall your entire repair process.
The Cold Pull technique is your first line of defence against internal debris. Heat your nozzle to the standard printing temperature for your loaded filament, then turn the heater off. As the temperature drops to approximately 90°C for PLA or 120°C for PETG, give the filament a firm, steady pull. The goal is to extract the material in a semi-solid state, bringing carbonized plastic and dust out with it. Be careful not to yank too violently, as excessive force can misalign your X-axis or damage the delicate PTFE liner inside the heat break. If the cold pull comes out clean but flow is still restricted, it is time to disassemble the toolhead.
Remove the fan shroud and unscrew the extruder motor from the carriage assembly. This exposes the internal drive assembly where filament often becomes "bird-nested" or wrapped around the gears. Use your precision tweezers to carefully pick out these snapped segments. If you find that your hardware is too damaged to salvage, our team offers professional 3D Printer Repair Services to get your machine back to factory specifications.
Deep Cleaning the Extruder Gears
Once the gears are accessible, use a brass wire brush or a blast of compressed air to remove the fine plastic dust settled in the teeth. This dust acts as a lubricant, causing the gears to slip even under high tension. After cleaning, reassemble the housing and verify the gear tension. You want enough pressure to leave light "bite marks" on the filament without flattening it into an oval shape. Manually feed a length of filament through the assembly before powering on to ensure there is no mechanical binding.
Replacing a Damaged PTFE Tube
A charred or deformed PTFE tube is a common culprit for persistent clogs. Inspect the end of the tube that sits against the nozzle; if it looks black, crispy, or constricted, it must be replaced. Use a dedicated tube cutter to ensure the new piece has a perfectly square end. Any gap between the tube and the nozzle creates a "dead zone" where molten plastic can pool and carbonize. Push the tube firmly into the collet until it seats against the back of the nozzle to prevent leaks that could ruin your heater block.
When to Opt for Professional 3D Printer Repair Services in Canada
Even the most dedicated makers hit a wall. Sometimes a 3D printer extruder repair reveals deeper issues that a home workshop isn't equipped to handle. If you discover a damaged mainboard, a snapped ribbon cable connector, or a stripped motor mount, you've reached a point of no return. These components often require specialized soldering or proprietary tools that most hobbyists don't possess. Forcing a repair in these situations often leads to more expensive damage. It is better to step back before a minor mechanical fault turns into a total system failure.
Consider the value of your time. If you've spent three days chasing a ghost in your machine, a professional technician can often diagnose the fault in minutes. For business-critical machines, the peace of mind that comes with a technician-verified repair is invaluable. Using professional 3D printer repair services Canada ensures that hidden electrical faults are identified before they cause a fire hazard. We help you protect your investment and keep your production schedule on track.
The Benefits of Expert Calibration
A technician-led repair doesn't just fix the immediate problem; it often results in better-than-factory print quality. Professional services include a complete repair cycle that covers firmware updates and precise PID tuning. This calibration ensures your heaters reach and maintain target temperatures with surgical accuracy. By having an expert overhaul your hardware, you realize a significant increase in reliability. You extend the overall life of your fleet and reduce the likelihood of future mechanical breakdowns through proactive part replacement and expert alignment.
National Support for Canadian Makers
Sourcing high-quality parts within Canada can be a logistical challenge for those in remote areas. Professional service providers maintain a broad inventory of components that are difficult to find locally. You can ship your machine to a central Canadian hub, knowing it will receive expert attention from people who understand our climate's impact on filament and hardware. Building a relationship with a mentor-style service provider means you have a dependable partner for future upgrades and technical support. Don't discard hardware that can be saved. Professional intervention is a sustainable way to keep your creative projects moving forward without the stress of constant troubleshooting. We are here to support your journey from a hobbyist to a pro-grade maker.
Restore Your Printer to Peak Performance
Mastering 3D printer extruder repair is the difference between a machine that gathers dust and one that consistently realizes your creative vision. By identifying the subtle differences between a simple nozzle clog and deep-seated mechanical wear, you can keep your hardware running with professional-grade precision. Remember that maintaining the thermal balance and keeping high-quality spare parts in your workshop are your best defences against unexpected downtime.
Sometimes the complexity of a repair requires a specialist's touch. Our expert technicians have years of hardware experience and are ready to tackle even the most stubborn mechanical or electrical faults. As an authorized retailer for major brands like Bambu Lab, we combine technical authority with fast national shipping across Canada to support your success. Don't let a hardware failure stall your progress. Book Professional 3D Printer Repair Services Today and get back to creating with confidence. Your next great project is just one functional extruder away.
Frequently Asked Questions
Why is my extruder making a clicking sound but still printing?
Your motor is likely skipping steps because it cannot push the filament through the nozzle at the commanded speed. This happens when there is a partial clog or if your printing temperature is too low for the material. Even if the print continues, the clicking indicates high internal pressure that will eventually lead to a total failure. Adjust your settings or perform a cold pull to resolve the resistance before it damages your drive gears.
How often should I clean my 3D printer extruder gears?
Perform a quick visual inspection every 50 hours of printing and a deep clean every 200 hours. If you frequently use abrasive materials like carbon fibre or wood-filled filaments, you should clean the gears more often. Plastic dust builds up in the gear teeth over time, which reduces their ability to grip the filament. Use a brass brush to clear out debris and maintain the precision required for consistent, professional-grade layers.
Can I use a sewing needle to clear a clogged nozzle?
Avoid using a sewing needle because it is usually too thick and can permanently damage the nozzle's internal geometry. Standard nozzles require specialized acupuncture needles or dedicated cleaning tools designed for 0.4mm openings. A sewing needle can scratch the soft brass, leading to turbulent flow and more frequent clogs in the future. If a proper cleaning needle doesn't work, a cold pull is a much safer method for a 3D printer extruder repair.
What is the difference between a direct drive and a Bowden extruder repair?
Direct drive repairs involve disassembling the toolhead because the motor sits directly above the hotend. This makes the filament path shorter but requires handling more delicate wires in a compact space. Bowden repairs often focus on the couplings and the long PTFE tube where friction can occur. While Bowden systems are easier to access, direct drive units require more precision during a 3D printer extruder repair due to their integrated sensors and complex gear assemblies.
Is it better to repair an extruder or just buy a new toolhead assembly?
Repairing is almost always more cost-effective if the issue is limited to worn gears or a clogged nozzle. You should only consider a full replacement if the main housing is cracked or the motor mounts are stripped beyond salvage. Consider the 50% rule: if the repair parts and your time exceed half the price of a new unit, an upgrade is logical. Professional repair services can often save complex hardware for a fraction of the replacement cost.
How do I know if my extruder stepper motor is burnt out?
A burnt-out motor usually feels excessively hot to the touch or emits a faint smell of ozone during operation. You might notice the motor "twitching" or vibrating without actually rotating the gears. Before you replace it, check the cable for any breaks and ensure the motor driver on the mainboard is still functioning. If the motor has lost its torque and can no longer push filament even with no resistance, the internal magnets are likely damaged.
What should I do if a filament breaks off inside the extruder?
Heat your hotend to the standard printing temperature to soften any plastic remaining in the melt zone. Try feeding a new piece of filament through the top to push the broken segment into the nozzle. If the segment is stuck in the gears, you'll need to open the housing and use precision tweezers to pluck it out. Be careful not to snag any internal ribbon cables or damage the filament sensor while navigating the narrow internal path.
Does using cheap filament cause more extruder clogs?
Yes, low-quality filaments often have inconsistent diameters and hidden impurities that lead to frequent jams. These variations create uneven pressure inside the hotend, which eventually causes the gears to grind the plastic into dust. Cheap materials also tend to carbonize more easily if left at high temperatures, creating stubborn clogs that are difficult to clear. Investing in high-quality filaments is a simple way to reduce the need for a 3D printer extruder repair and improve reliability.