
Did you know that nearly 90 percent of discrete Y-axis layer shifts are caused by simple mechanical slips rather than complex software bugs? It's incredibly frustrating to walk into your workshop and find a half-finished print that looks like a staircase, especially when you've already wasted hours of time and expensive filament. We understand that sinking feeling of seeing a "shifted" model and wondering if your motor is burnt out or if your slicer settings are to blame. You want to get back to creating, but the fear of making a mistake during a repair can be a major barrier.
Our goal is to help you master layer shifting on y axis troubleshooting so you can eliminate these failures for good. This comprehensive guide provides a step-by-step diagnostic path to help you identify whether your issue is a loose grub screw, improper belt tension, or an overheating stepper driver. We'll show you how to organize your maintenance routine and realize perfectly aligned prints every time. You'll gain the confidence to handle your own repairs and know exactly when it's time to call a professional technician for backup.
Key Takeaways
- Learn to distinguish between minor "stair-step" patterns and major offsets to diagnose the root cause of synchronization loss immediately.
- Master layer shifting on y axis troubleshooting by finding the "Goldilocks" belt tension and securing drive pulley grub screws against the motor's flat spot.
- Detect early warning signs of thermal throttling and motor overheating to prevent silent step loss during intensive or high-speed prints.
- Calibrate your slicer's acceleration and jerk settings to manage build plate inertia and avoid nozzle collisions with curling filament.
- Understand the threshold for professional repair services so you can recognize when a failing motherboard or motor requires expert intervention.
What is Layer Shifting on the Y-Axis and Why Does it Occur?
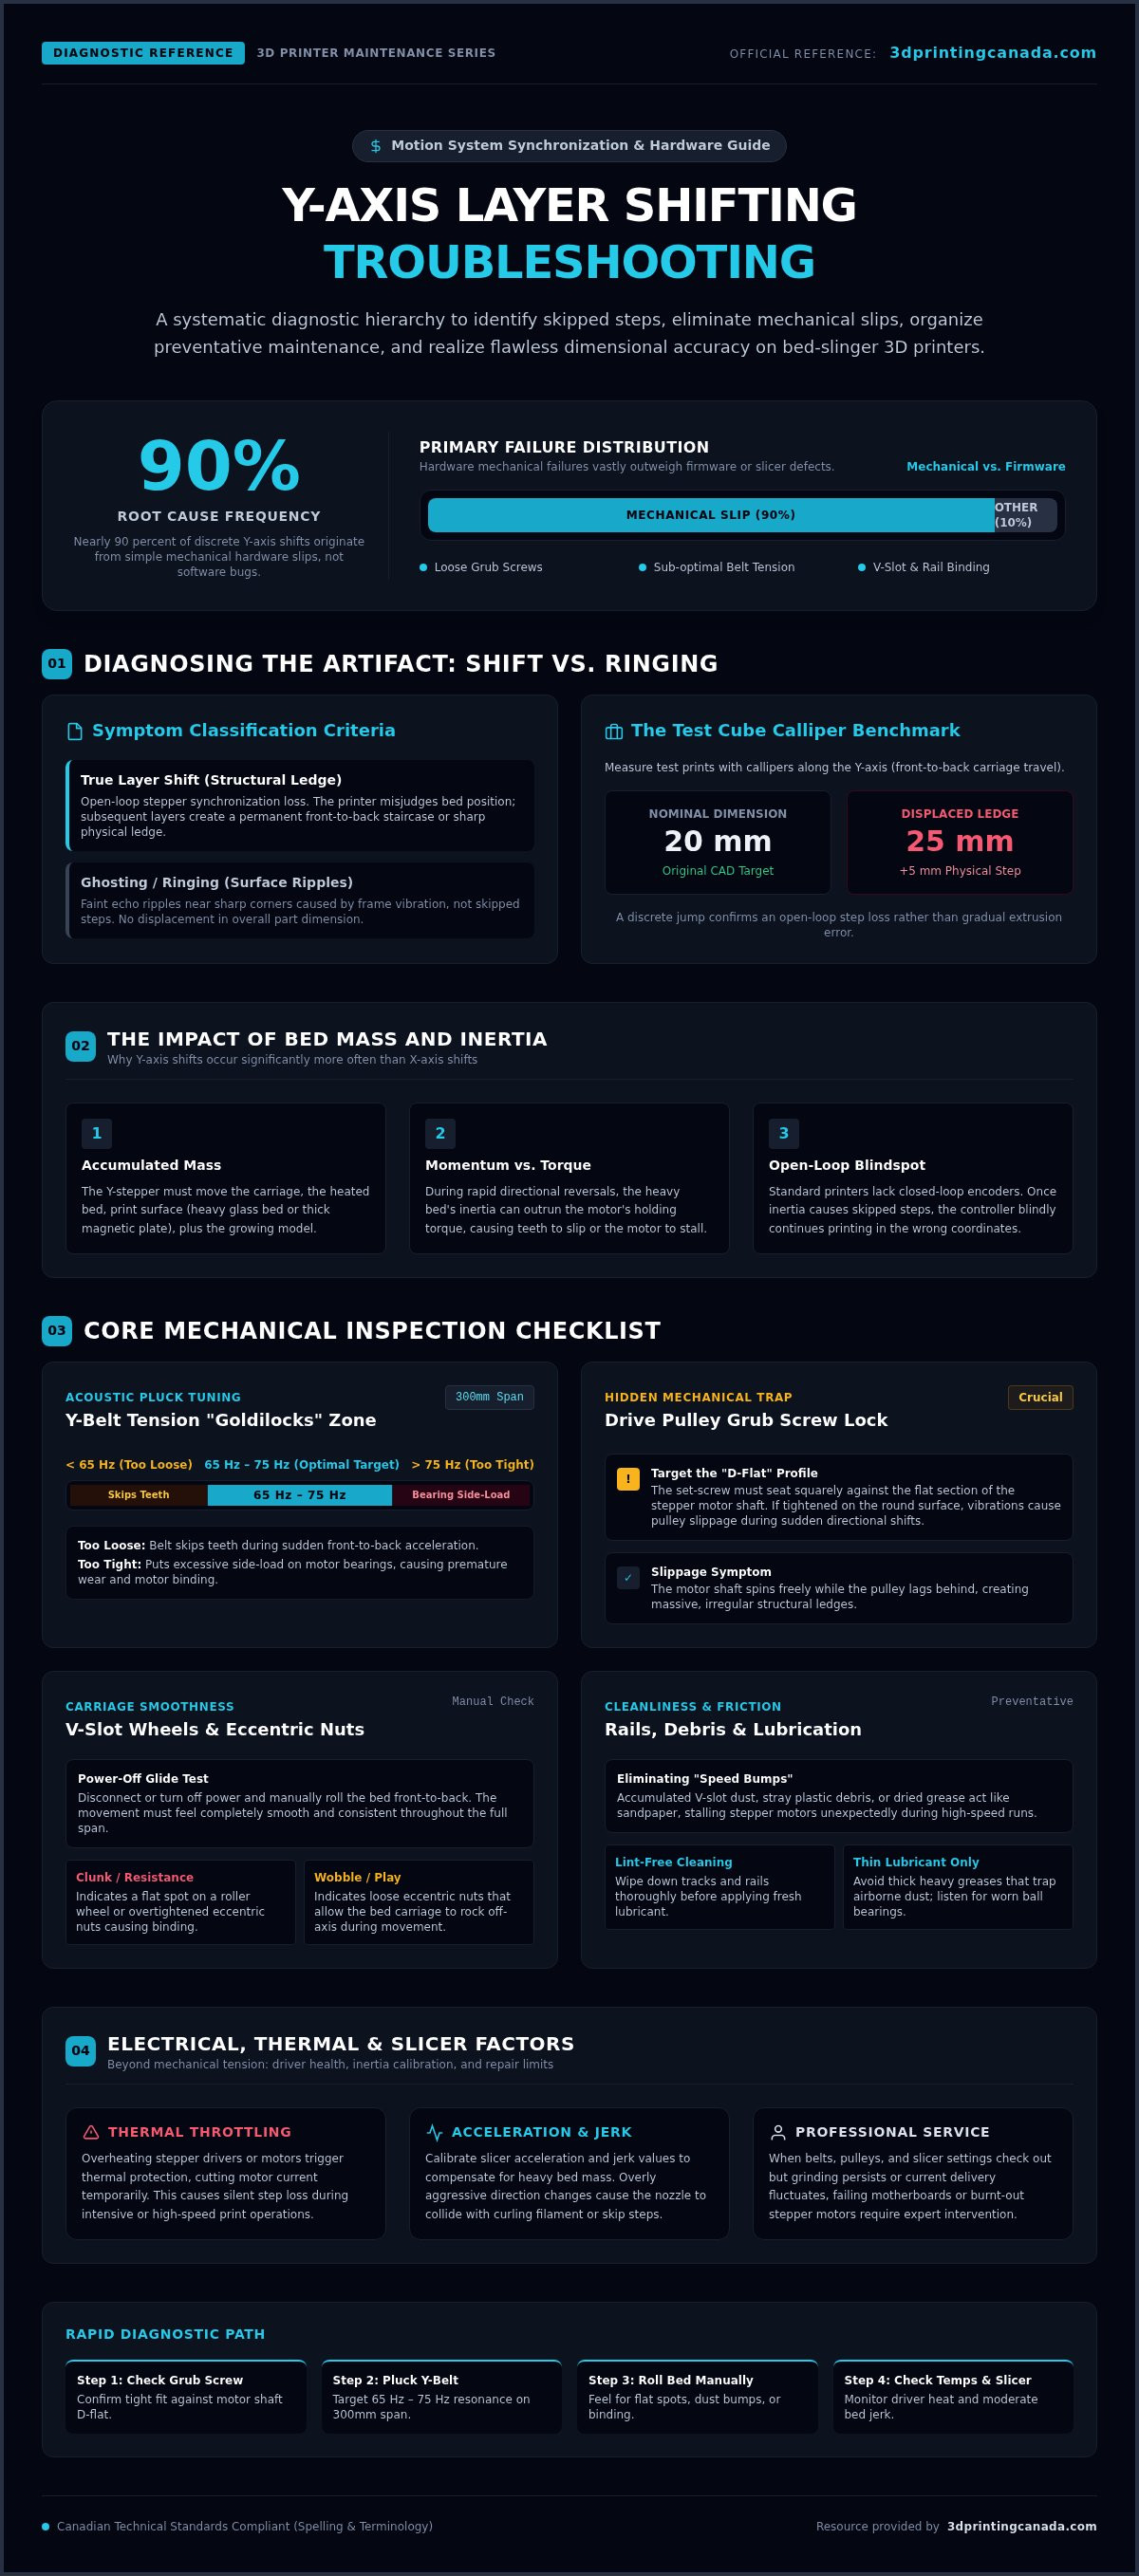
Layer shifting on the Y-axis is one of the most visible failures in 3D printing. It occurs when your printer loses track of where the build plate is located in relation to the nozzle. Instead of a vertical wall, your print develops a "stair-step" look or a sudden, massive offset that ruins the entire part. This is fundamentally a loss of stepper motor synchronization. Your printer's brain sends a command to move, but the physical hardware fails to execute it perfectly. This result is what we call "skipped steps."
To fix this, you need to understand how stepper motors operate and skip steps when they encounter too much resistance or lack enough electrical current. Because most hobbyist printers use an "open-loop" system, the machine has no way of knowing it missed a beat. It simply keeps printing as if nothing happened, but now every subsequent layer is misaligned. Effective layer shifting on y axis troubleshooting helps you realize whether the shift happened once or if it's a creeping, repetitive problem throughout the print.
Identifying the Direction of the Shift
Before you start turning screws, confirm the shift is actually on the Y-axis. On most machines, the Y-axis controls the front-to-back motion of the build plate. Look at your print on the bed; if the alignment failure moves toward the front or the back of the machine, you've found your culprit. Proper layer shifting on y axis troubleshooting requires you to distinguish this from "ghosting" or "ringing," which are faint ripples near corners. A true layer shift is a structural ledge. Grab a pair of callipers and a test cube. If your 20mm cube suddenly measures 25mm because of a ledge, you have a definitive mechanical or electrical shift to address.
The Impact of Bed Mass and Inertia
Why does this happen so often on the Y-axis? Most popular printers are "bed-slingers," meaning the motor has to move the entire weight of the build plate, the heating element, and your printed object. This creates significant inertia. If you've upgraded to a heavy glass bed or a thick magnetic plate, your motor needs much more torque to change direction quickly. When your print speed is too high, the momentum of that heavy bed can "outrun" the motor's ability to stop it, causing the belt to skip or the motor to stall. It's a simple battle of physics where mass and speed combine to overcome your printer's grip.
Mechanical Troubleshooting: Tightening Your Hardware
Effective layer shifting on y axis troubleshooting starts with the most common culprit: belt tension. A belt that is too loose will skip teeth during rapid accelerations, while a belt that is too tight puts excessive side-load on the motor bearings. For a standard 300mm Y-axis span, aim for an acoustic frequency between 65 Hz and 75 Hz when the belt is plucked like a guitar string. This "Goldilocks" zone ensures enough grip without causing the motor to bind or wear out prematurely. Finding this balance is a cornerstone of troubleshooting 3D printer layer shifts effectively.
While checking the belt, inspect the V-slot wheels or linear rails for physical obstructions. Debris, dust, or even a tiny bit of stray filament can create a "speed bump" that stalls the motor. Turn off the power and move the bed manually from the front to the back of the machine. It should feel smooth and consistent. If you feel a "clunk" or persistent resistance, you likely have a flat spot on a roller wheel or an eccentric nut that is tightened too much. Adjust the nuts so the carriage doesn't wobble, but ensure it doesn't bind at any point along the track.
The 'Grub Screw' Check: A Common Hidden Failure
Many users overlook the tiny set-screw, also known as a grub screw, that holds the drive pulley to the motor shaft. If this screw vibrates loose, the motor shaft will spin freely while the pulley stays still, usually during sudden direction changes. Always ensure at least one grub screw is tightened directly against the "D-flat" or the flat side of the motor shaft. If your pulley continues to slip despite tightening, it might be time to invest in precision-engineered pulleys and belts to restore your printer's accuracy.
Linear Rail and Bearing Maintenance
Cleanliness is vital for consistent motion. Wipe down your rails with a lint-free cloth to remove old grease and accumulated "V-slot dust" that can act like sandpaper on your hardware. Apply a thin layer of specialized lubricant to the bearings or rods, but avoid using thick greases that attract more grit over time. If you hear a grinding noise even after cleaning, the internal ball bearings might be worn out. Replacing these components early saves your motor from unnecessary strain and keeps your layers perfectly stacked throughout long prints.
Electrical and Thermal Factors: Beyond the Belts
Sometimes the hardware looks perfect, but the electronics are failing silently. If your belts are tight and your pulleys are secure, it's time to look at the electrical side of layer shifting on y axis troubleshooting. Heat is the primary enemy here. When a stepper motor runs for hours at high speeds, it generates internal resistance. If that heat isn't managed, the motor's magnetic field weakens, leading to lost torque. You can check this easily: if the Y-axis motor is too hot to touch comfortably, it's likely overheating and dropping steps under load.
Electronics also protect themselves. Modern silent drivers, like the TMC2209, use thermal throttling to prevent permanent damage. Instead of a loud grinding noise, these drivers simply stop sending full power to the motor for a fraction of a second. This results in a silent layer shift that is incredibly hard to track down. This phenomenon is closely linked to University of Michigan motion and vibration research, which highlights how unmanaged inertia and high-acceleration movements can overwhelm a system's thermal and mechanical limits.
Don't ignore the wiring. The Y-axis cable on a bed-slinger is constantly flexing. Over time, the copper strands inside the harness can break, causing intermittent power loss. This usually looks like a random shift that only happens when the bed reaches a specific position. Similarly, a struggling Power Supply Unit (PSU) might sag in voltage when the bed heater and Y-motor both draw peak current at the same time, causing the motor to stall momentarily.
Managing Stepper Motor Heat
High-speed printing isn't just about fast movements; it's about the energy required to stop and start a heavy build plate. This energy translates directly into heat. You can manage this by adding stick-on copper heat sinks to the motor casing or installing a dedicated 40mm cooling fan. Thermal runaway in drivers is a protection mechanism that cuts power when temperatures exceed safe operating limits to prevent the mainboard from catching fire.
Adjusting Stepper Driver Current (Vref)
Your motor current is a delicate balance. If the current is too low, the motor lacks the "muscle" to move the bed; if it's too high, the motor and driver will bake. On older DIY boards, you'll need a multimeter to measure the Vref (voltage reference) on the driver's potentiometer. For 2026-era silent drivers, a standalone Vref between 0.85V and 1.15V is typical. If you're running Klipper or Marlin 2.x in UART mode, you can organize these settings in your configuration file. Aim for a Y-axis RMS run current between 650 mA and 900 mA to handle the inertia of a standard build plate without inducing a thermal shutdown.
Slicer Settings and G-Code Optimization
Even if your hardware is perfectly tuned, aggressive slicer settings can force your printer into failure. Your G-code acts as the set of instructions for your machine; if those instructions demand more torque than the motor can provide, you will lose synchronization. Effective layer shifting on y axis troubleshooting must include a deep dive into how your slicer handles momentum. When the software asks a heavy build plate to stop and reverse direction instantly, the physical inertia often overcomes the motor's grip, leading to a visible shift.
Travel speed is a common culprit. Many hobbyists push travel moves to 150mm/s or higher to save time, but these rapid bursts are exactly when skipped steps occur. If your software tweaks aren't enough to stabilize your prints, you might need to realize that your hardware requires a professional touch. Consider reaching out for expert 3D printer repair services to ensure your motor drivers are actually capable of handling your desired performance levels.
Taming Acceleration for Heavy Beds
Acceleration and Jerk (or Junction Deviation) control how quickly your printer reaches its target speed. For most bed-slinger printers, keeping Y-axis travel acceleration between 500 and 1,000 mm/s² is a safe starting point. Research indicates that layer shifts reliably occur when Y-axis travel acceleration exceeds 1,500 to 2,500 mm/s² on standard motors without active resonance compensation. You can also organize your settings to reduce infill speed, as the rapid zig-zag patterns of high-speed infill are notorious for shaking the Y-carriage loose. Using modern slicers like Cura 5.13.0 or OrcaSlicer 2.4.2 allows you to set specific limits for the Y-axis alone, protecting it from the high-speed settings that the lighter X-axis might handle easily.
Preventing Nozzle Snags and Collisions
A layer shift isn't always caused by a weak motor; sometimes the nozzle simply hits an obstacle. If your filament curls upward due to poor cooling or if you have slight over-extrusion, the nozzle can snag on the hardened plastic. This physical collision creates enough resistance to stall the Y-axis motor momentarily. You can mitigate this by enabling "Avoid Crossing Perimeters," which keeps the nozzle over the printed area rather than traveling across open gaps where curling is most common. Additionally, Z-hop (or Z-lift) provides a vital safety margin by lifting the nozzle slightly during every travel move, ensuring it clears any warped sections of the print without a collision.
When to Seek Professional Repair Services in Canada
Sometimes, even the most thorough layer shifting on y axis troubleshooting reaches a dead end. If you've tightened every belt and adjusted your Vref but the print still shifts, you might be facing a deeper hardware failure. A stepper motor that makes a persistent grinding noise or feels "notchy" when moved by hand often has internal damage. These motors can lose torque over time, especially if they've been subjected to excessive heat or persistent side-loading from overtightened belts.
Logic faults on the motherboard are another common culprit. A blown stepper driver or an intermittent fault in the board's circuitry can cause the Y-axis to drop steps randomly. These issues are notoriously difficult to diagnose at home without specialized equipment. In Canada, professional repair centres typically charge a standard diagnostic bench fee of $65 CAD. This fee is a smart investment; it prevents you from throwing money at the wrong parts and ensures your machine is calibrated to factory standards. Accessing expert 3D printer repair services Canada allows you to get back to printing with a guarantee that the root cause has been addressed.
The Limits of DIY Troubleshooting
It's easy to fall into a cycle of replacing components one by one. You might swap the belt, then the pulley, and finally the motor, only to find the shift persists. This often points to a faulty control board or a burnt-out driver socket that requires professional soldering or a full board replacement. Professional workshops report that standard bed-slinger alignment, driver tuning, and gantry de-racking repairs take 2 to 4 billable hours on average. Technicians can perform precise alignment that is difficult to achieve in a home workshop, ensuring your gantry is perfectly square.
Ordering Precision Spare Parts
Using the right components is just as important as the repair itself. If you're running a high-speed machine, you need parts that can withstand increased inertia. You can find genuine Bambu Lab accessories Canada and high-torque motors designed for modern performance standards. Don't settle for generic belts; opt for genuine Gates belts to ensure consistent tension. Additionally, choosing high-quality filaments helps prevent the curling and blobs that lead to nozzle collisions. Quality materials and parts work together to keep your Y-axis stable and your layers perfectly aligned.
Take Control of Your Print Quality
Mastering the balance between mechanical tension and software limits is the secret to consistent success. By following a structured approach to layer shifting on y axis troubleshooting, you can identify whether a loose pulley or aggressive acceleration is sabotaging your work. Remember that a well-maintained printer isn't just about fixing current errors; it's about building a reliable foundation for every future project. You now have the diagnostic skills to distinguish between a simple belt adjustment and a deeper electrical fault.
If you've tried the DIY route and the shift persists, don't let it stall your creativity. Our national repair centre is here to support the Canadian maker community with expert technicians who specialize in all major FDM brands. We stock thousands of spare parts to ensure a fast fix for even the most complex board-level or motor issues. We're dedicated to helping you realize your creative vision without the frustration of technical setbacks. Book Your Professional 3D Printer Repair Service Today. You've got the tools and the knowledge to get back on track. Happy printing!
Frequently Asked Questions
Can a loose belt really cause a 2cm layer shift?
Yes, a loose belt is one of the most common causes of a significant 2cm offset. If the belt lacks tension, it can jump several teeth on the drive pulley during a rapid travel move. This is a primary step in layer shifting on y axis troubleshooting. You can usually hear a distinct "clack" when this happens. Ensure your belts are tuned to the 65 to 75 Hz range to prevent these massive jumps.
Why does my Y-axis shift only happen on tall prints?
Tall prints often shift because of cumulative thermal buildup in the stepper motor or driver. As the print continues for hours, the motor generates heat that can lead to thermal throttling. Additionally, as the print grows, the nozzle is more likely to strike a slightly warped edge. This collision provides enough resistance to stall the Y-axis motor, especially if your acceleration settings are too aggressive for the bed's mass.
Is it possible for a SD card error to cause a layer shift?
While rare, a corrupted SD card can technically cause a layer shift if the G-code data is misread. Most of the time, card errors result in the printer freezing or leaving large blobs on the surface. If you suspect the card, try printing the same file via a different USB drive or a fresh SD card. This helps you realize if the issue is digital corruption rather than a mechanical hardware failure.
How do I know if my stepper motor is overheating?
You can identify an overheating motor by touching the casing during a print; if you can't keep your finger on it for more than a few seconds, it's too hot. Motors operating over 80 degrees Celsius often lose torque and skip steps. If you experience silent shifts without any grinding noises, your stepper driver might be entering a thermal protection mode. Adding a heat sink or a cooling fan can often resolve this problem.
What is the difference between a layer shift and a lost home position?
A layer shift is a mid-print misalignment where the printer continues the job but at a physical offset. A lost home position happens when the printer hits an endstop prematurely or fails to trigger it correctly. If your printer thinks the bed is at the centre when it's actually at the back, it will try to print in thin air or crash into the frame. Both issues require careful inspection of your limit switches and motor synchronization.
Can firmware updates fix Y-axis layer shifting?
Firmware updates can definitely help resolve shifting issues. Modern updates often include better motor current management and resonance compensation like Input Shaping. These features help the printer handle the inertia of a heavy build plate more effectively. By refining how the printer handles acceleration, firmware can reduce the mechanical stress that leads to skipped steps. Always back up your configuration before performing an update to ensure you don't lose your custom settings.
Does the type of filament I use affect layer shifting?
The filament type affects shifting indirectly through warping and bed adhesion. Materials like ABS or ASA tend to warp and curl upward at the edges. If the nozzle strikes these hardened, curled sections during a Y-axis move, the motor may stall and cause a shift. Using high-quality filaments with consistent diameter and proper cooling settings reduces the risk of these physical collisions. Better bed adhesion keeps the part from moving, which also prevents shifts.
How often should I lubricate my Y-axis linear rails?
You should lubricate your Y-axis linear rails every 200 to 500 hours of printing or roughly every three months. If you notice a "dry" grinding sound or see visible dust buildup on the rails, clean them with a lint-free cloth and apply a fresh layer of specialized lubricant. Regular maintenance prevents the friction that forces your motor to work harder. This simple habit is a vital part of layer shifting on y axis troubleshooting and long-term machine health.