
More bed adhesive isn’t always the answer to lifting nylon corners. If you’re looking for warped print corners nylon bed adhesion tips, start by checking the whole first-layer environment. Damp filament, uneven cooling, drafts, or an incompatible build surface can all undermine adhesion. Adding glue without finding the cause may make the next failure harder to diagnose.
It’s frustrating to watch a nylon print peel away after hours of setup, especially when advice seems to change with every filament grade and printer. You don’t need to change several settings at once. First identify the likely cause, then test one adjustment at a time.
This guide compares practical adhesion options for different build surfaces, explains how to check filament handling and first-layer conditions, and outlines a repeatable test. It also covers signs that persistent lifting may point to a printer issue rather than a slicer setting.
Key Takeaways
- Use these warped print corners nylon bed adhesion tips to narrow down whether moisture, cooling, the build surface, or printer conditions may be behind corner lift.
- Check the filament manufacturer’s guidance for drying and print conditions before changing slicer settings.
- Compare surface preparation, approved adhesives, a brim, and reduced drafts to find an approach compatible with your plate and filament.
- Test one adjustment at a time so you can tell which change improves first-layer reliability.
- Recurring levelling, heating, motion, or sensor problems may call for printer repair support.
Why nylon print corners warp and lose bed adhesion
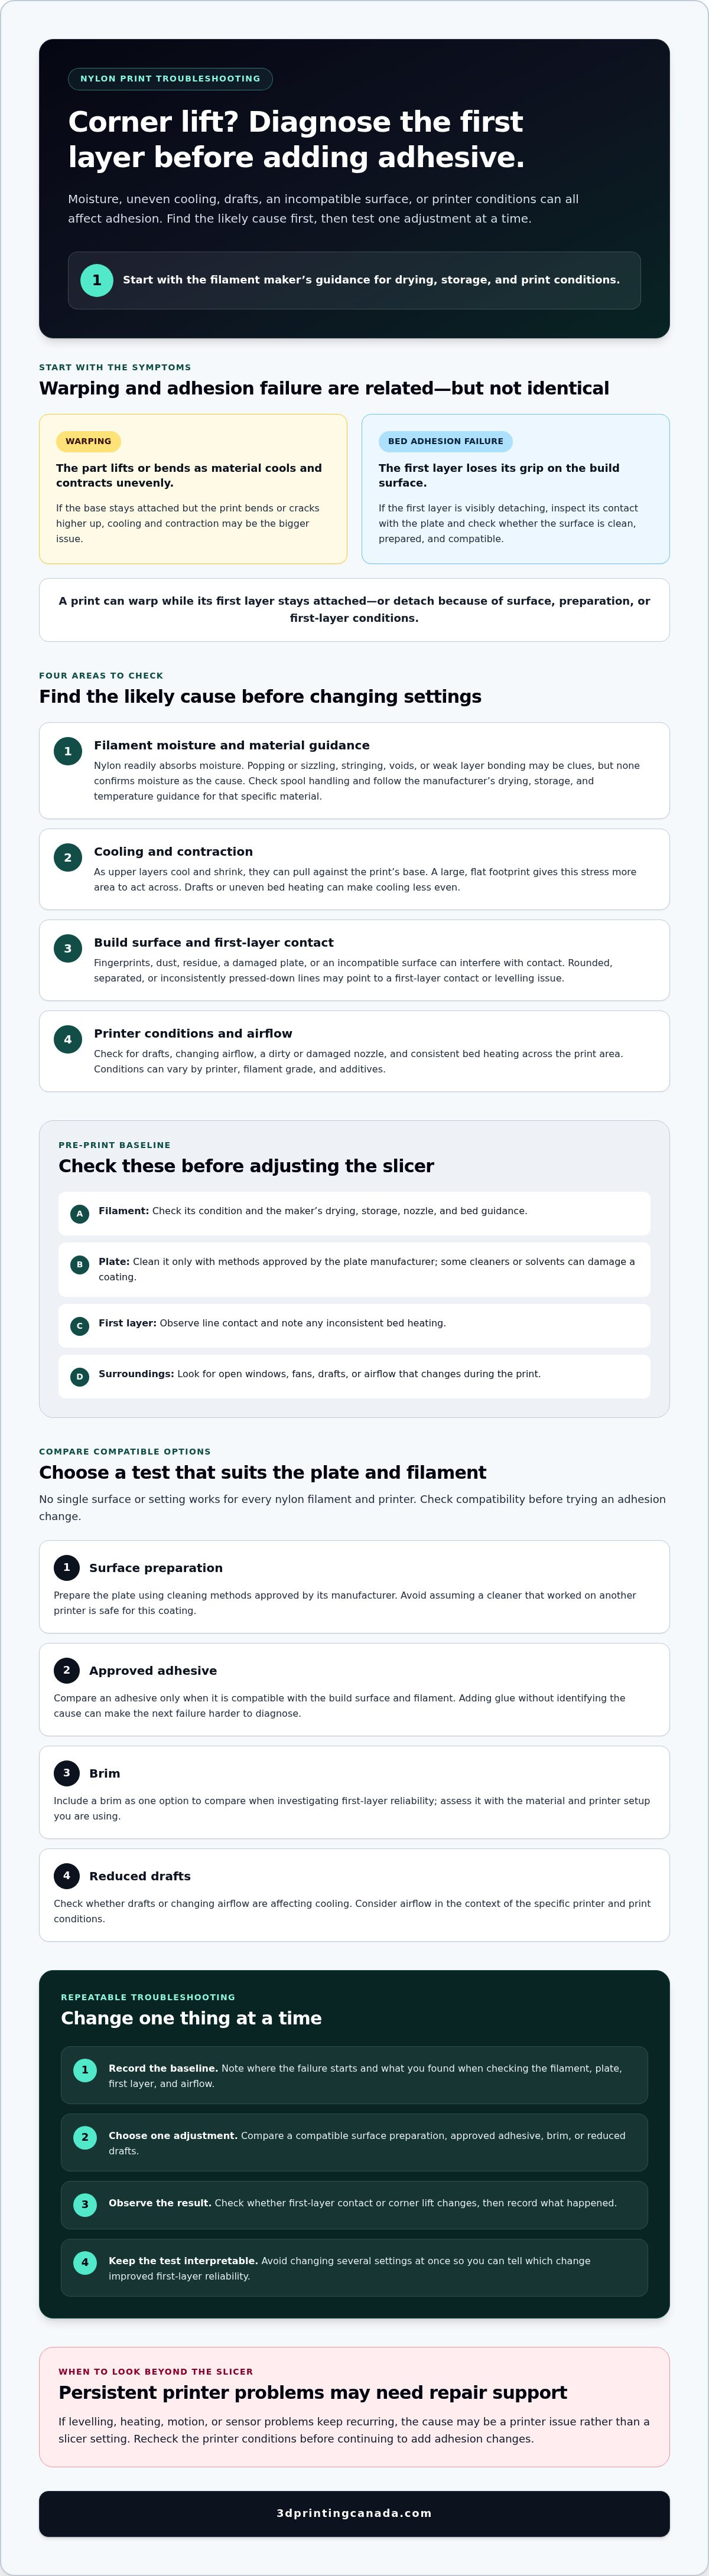
Warping is the lifting or bending of a printed part as cooling material contracts unevenly. Bed adhesion failure is more specific: the first layer loses its grip on the build surface. The two problems can happen together, but they aren’t identical. A part may warp while its first layer stays attached, or detach because the surface is dirty, incompatible, or poorly prepared.
In Fused filament fabrication (FFF), the printer lays down molten filament in successive paths. As each layer cools, it contracts and can pull against the layers beneath it. Nylon’s material behaviour makes its surroundings especially important, but no single setting or surface works for every nylon filament and printer.
How nylon shrinkage and cooling create lifted corners
As upper layers cool and shrink, they place stress on the print’s base. If the first layer can’t resist that pull, corners or edges may lift. A large, flat footprint gives the stress more area to act across. Drafts and uneven bed heating can make one part of a print cool faster than another, increasing uneven contraction. Nylon grades and additives can behave differently, so treat settings as material-specific.
Why damp filament can complicate adhesion troubleshooting
Nylon readily absorbs moisture from the air, which can affect print quality even when the bed is prepared correctly. Popping or sizzling during extrusion, stringing, voids, or weak layer bonding may be clues that filament has absorbed moisture, but none confirms the cause on its own. Moisture is only one possible reason for corner lift. Check the filament maker’s drying instructions and temperature limits before changing settings or drying the spool.
Before trying another adhesive, separate the symptoms. If the first layer is visibly detaching, inspect the build surface and first-layer contact. If the base stays down but the part bends or cracks higher up, cooling and contraction may be the bigger issue. A clean plate, appropriate bed conditions, and protection from drafts can all matter. The right combination depends on the filament grade, additives, build surface, and printer.
Think of warped print corners nylon bed adhesion tips as a reminder to diagnose the whole first-layer environment, not just the glue. Start with the filament manufacturer’s guidance and note where the failure begins. That gives you a useful baseline for the checks and tests below without changing several variables at once.
Check nylon filament, build plate, and printer conditions first
Before changing slicer settings, inspect the material, surface, and printer. A handling or setup issue won’t be fixed by a temperature adjustment. Use this sequence to establish a baseline, then change one thing at a time if lifting continues.
Prepare nylon filament and confirm its material guidance
Nylon can absorb moisture during storage and handling, so check how the spool has been kept and whether it may need drying. Follow the filament maker’s instructions for drying and storage. Don’t assume one temperature or drying time suits every grade or additive. Confirm the recommended nozzle and bed conditions for that specific spool, too. Material references such as Formlabs’ 3D printing materials guide can help explain material differences, but your filament manufacturer’s instructions should guide your print settings.
Inspect the plate, first layer, and surrounding airflow
Fingerprints, dust, and adhesive residue can interfere with contact between the first layer and build plate. Clean the surface only with methods approved by the plate manufacturer. Some cleaners or solvents may damage a coating, so don’t use one just because it worked on another printer.
Watch the first layer as it prints. Lines that look rounded, separated, or inconsistently pressed down may point to a first-layer contact or levelling issue. Check for a dirty or damaged nozzle and confirm that the bed heats consistently across the print area. Look for open windows, fans, or other drafts, and note whether conditions inside the printer change during a print. Rather than assuming one enclosure setup suits every machine, check whether airflow or changing ambient conditions could affect this job.
Pre-print checklist: Confirm the filament’s condition and maker guidance, prepare the plate using approved cleaning methods, observe first-layer contact and bed consistency, and check for drafts or changing airflow.
Record what you find before adjusting the slicer. If the filament, plate, and printer conditions check out, you’ll have a better starting point for comparing adhesion fixes. If you need to replace material, explore 3D printing filament options and compare the manufacturer’s guidance with your printer’s capabilities.
Warped print corners nylon bed adhesion tips: choose a compatible fix
The right fix depends on the nylon, build plate, printer, and part shape. A surface that grips one filament may be unsuitable for another, and an adhesive that helps on one plate could leave residue or make removal risky on a different coating. Treat these warped print corners nylon bed adhesion tips as options to compare, not a universal recipe.
For an overview of nylon-specific surfaces and adhesives, consult this 3D printing with nylon guide, then confirm compatibility with your filament and plate manufacturers.
| Option | When it may help | Compatibility or removal caution |
|---|---|---|
| Clean, compatible surface | Start here if fingerprints, dust, or residue may be weakening first-layer contact. | Use only cleaning methods approved for the plate. Surface coatings have different care requirements. |
| Approved build-surface adhesive | May improve grip on a compatible plate or help parts release more predictably after printing. | Check both plate and filament guidance. Some adhesives can bond too strongly or leave residue if used on the wrong surface. |
| Brim | Adds first-layer contact around a model, which may help resist corner lift on suitable geometry. | Test brim width in the slicer. Larger brims can take longer to remove and may mark edges. |
| Reduced draft exposure | Can help if moving air is cooling one side of the part unevenly. | Check the printer maker’s guidance before changing enclosure or airflow conditions. |
When a brim or larger first-layer footprint can help
A brim extends the first layer outward, giving corners more contact with the build surface. It can help with a model that has a small footprint or sharp corners, but it won’t correct a dirty plate or unsuitable first-layer contact. Try a modest brim, then adjust its width based on whether the corners stay down and how easily you can remove the extra material.
When to use a build-surface adhesive
Choose an adhesive only if the plate and filament guidance allow it. On some surfaces, a suitable adhesive can support adhesion while also acting as a release layer, reducing the risk of a part bonding too firmly. PEI and other coated plates have different care and adhesive requirements. Don’t combine products or use a cleaner alongside an adhesive unless both manufacturers confirm compatibility.
No single method suits every nylon, plate, and printer. Start with the least disruptive compatible option, then test one change at a time. If a clean surface and reduced drafts don’t address the lift, compare a brim or approved adhesive rather than applying several fixes at once.
Follow a controlled test to stop nylon corners lifting
A repeatable test helps you find the cause without turning every print into a new experiment. Keep the same nylon, model orientation, build surface, and surrounding conditions between attempts. Change one variable at a time, and record the result before deciding what to adjust next.
Run a small, repeatable nylon adhesion test
Choose a simple test shape with corners and a footprint similar to the problem area on your part. A small rectangular plate can show whether corners lift while using less filament and time than repeating the full print. Keep your notes beside the printer so you can compare attempts.
- Confirm material guidance. Check the spool maker’s instructions for drying, nozzle temperature, bed temperature, and any limits for your specific nylon grade.
- Prepare the plate. Clean it using a method approved for its surface, then make sure it’s dry and free of fingerprints or residue.
- Print a baseline test. Use the current known settings. Note which corners lift, when the lift begins, and whether the first-layer lines look consistent.
- Change one factor. If the baseline confirms lift, test one compatible adjustment, such as first-layer speed, cooling, a brim, or draft exposure. Keep the other settings unchanged.
- Compare and record. Use the same test shape and conditions again. Record the material, surface, setting changed, and result before choosing the next test.
Adjust first-layer and cooling settings methodically
Start with settings recommended by the filament manufacturer. If those are confirmed and the first layer still lifts, adjust only one slicer variable per attempt. For example, test a slower first layer before changing the brim or cooling. Nylon settings vary by grade and printer, so treat any profile as a starting point, not a guaranteed fix.
Speed and cooling can affect how the first layer bonds and how quickly the print contracts, so evaluate each change separately. If you’re also exploring faster print settings, use this high-speed 3D printing guide as context. Don’t change speed and cooling together while diagnosing corner lift.
These warped print corners nylon bed adhesion tips work best as a logged test process: use the same small shape, change one variable, and compare the result. If you need a different material to test against your printer’s capabilities, explore 3D printing filament options.
Know when nylon warping points to a printer issue
If nylon corners keep lifting after you’ve followed the filament maker’s guidance and completed controlled tests, pause before making more slicer changes. The failure pattern can help you decide whether to keep investigating material-specific adhesion or check the printer itself. These warped print corners nylon bed adhesion tips aren’t a component diagnosis: corner lift alone can’t identify which part, if any, is at fault.
Recognize when repeated failures need more than slicer changes
Look for problems that recur across prints or materials, not just one nylon job. First-layer contact that’s consistently uneven in the same bed area, apparently inconsistent bed heating, or repeated levelling or homing irregularities may call for further printer checks. Unusual motion, skipped movements, or sensor readings that vary between attempts are also worth documenting. None of these signs proves that a particular component has failed.
Check the printer’s documentation before disassembling, adjusting, or replacing anything. Note when the symptom occurs, where it appears, and whether it also affects other filaments. If careful tests point to an ongoing hardware concern, review this guide to 3D printer repair services to understand a possible next step.
Choose filament and support that fit the next troubleshooting step
If the printer behaves consistently with other materials but struggles with nylon, revisit the filament’s specific requirements before assuming there’s a hardware fault. Nylon grades and additives can differ in handling, drying, and recommended print conditions. Match the material to the part you’re making and your printer’s capabilities, then follow the spool manufacturer’s instructions. A different filament category may be worth considering if its material requirements better suit your setup.
Keep your test notes: filament type, surface, observed first-layer contact, and the single change you made. That record makes it easier to explain the problem if you seek technical help and helps you avoid repeating tests without a clear reason. If the symptoms remain consistent across controlled attempts, professional repair support may help investigate printer-related causes.
Take it one step at a time: confirm the material guidance, repeat your test under consistent conditions, then seek support if the same hardware-related symptoms persist. You can explore 3D printing supplies and support as you plan your next troubleshooting step.
Make your next nylon print a more reliable one
Reliable nylon adhesion comes from matching the filament, build surface, and printer conditions, not relying on one universal fix. Start with the material maker’s guidance, choose a compatible adhesion approach, then test one change at a time. These warped print corners nylon bed adhesion tips offer a practical way to learn from each attempt instead of repeating the same failed print.
If your notes point to a persistent printer issue, professional repair services may help identify what needs attention. If you’re choosing material for another test, compare filament options with your printer’s capabilities and the manufacturer’s handling instructions. 3D Printing Canada offers online sales of 3D printing filaments and equipment across Canada, as well as professional printer repair services.
Explore 3D printing supplies and support for your next step. Keep your tests consistent, trust what the results show, and build towards dependable nylon prints one adjustment at a time.
Frequently Asked Questions
Why do nylon prints warp at the corners?
Nylon corners lift when cooling material contracts and pulls unevenly against the build plate. Moisture in the filament, a contaminated surface, weak first-layer contact, drafts, or inconsistent bed conditions can also contribute. A lifted corner doesn’t point to one definite cause. Check the material, plate, and printer conditions separately, and observe where the problem begins before adjusting settings.
How do I stop nylon from lifting off the build plate?
Start with the filament maker’s handling and printing guidance, then prepare the plate using a cleaning method compatible with its surface. Check that the first layer makes consistent contact and reduce drafts if airflow appears to affect the print. If lifting continues, test a brim or an approved adhesive. These warped print corners nylon bed adhesion tips work best when you change one factor at a time and compare the same small test print.
Does nylon filament need to be dried before printing?
Nylon can absorb moisture, so follow the drying and storage instructions for your specific filament. Damp material may contribute to print-quality problems, but it isn’t the only possible cause of corner lift. Surface contamination, first-layer contact, and cooling conditions may also matter. Don’t apply a universal drying time or temperature across different nylon grades. Check the spool maker’s recommendations and your printer’s material limits before drying.
Is a brim a good fix for warped nylon corners?
A brim can help by increasing the first layer’s contact area with the build plate, particularly for a model with a relatively small footprint. It won’t correct every cause of warping, such as damp filament or uneven heating. Test it while keeping the material and printer conditions consistent. Choose a brim width that suits the model, and consider how much work it’ll take to remove the brim cleanly.
Can I use glue on a 3D printer bed for nylon?
Sometimes, but the adhesive must be compatible with both the nylon and the build surface. On some plates, an approved adhesive may aid release as well as adhesion, so adding more isn’t necessarily better. Check the plate and filament makers’ instructions before applying a product. Avoid mixing adhesives or using cleaners with them unless compatibility is confirmed, since an unsuitable product may leave residue or affect the plate.
What bed temperature should I use for nylon?
There isn’t one bed temperature that suits every nylon grade, printer, and build surface. Begin with the temperature guidance supplied by the filament maker, and confirm that your printer and plate can support it. If corners still lift, check plate preparation, first-layer contact, drafts, and bed heating consistency. Make any temperature adjustment as a controlled test rather than changing several settings at once.
When should I contact a 3D printer repair technician about warping?
Consider seeking technical support if controlled tests still show recurring levelling problems, uneven bed heating, or other persistent hardware symptoms after you’ve checked material handling and surface preparation. Corner lift alone doesn’t confirm a printer fault. Before contacting a technician, record the filament, build surface, settings, first-layer appearance, and test results. That history helps distinguish a recurring machine issue from a nylon-specific adhesion problem.