
You've spent six hours on a complex print, only to find a bird's nest of wasted filament and a jammed extruder staring back at you. It's an incredibly frustrating reality for many makers, but these setbacks don't have to be the norm for your workshop. We understand the headache of losing an entire spool to poor bed adhesion or the stress of wondering if a cheap replacement part will actually fit your specific model. Dealing with common 3d printer problems like heat creep or inconsistent extrusion can make even the most passionate hobbyist feel stuck.
The good news is that most of these failures are simple symptoms of worn-out consumables or outdated hardware. In this guide, you'll learn how to accurately identify hardware-related failures and select the exact components required to restore your machine to peak performance. We'll walk you through the essential upgrades, from hardened steel nozzles to high-performance build plates, that prevent future clogs and ensure your results stay consistent. Get ready to transform your finicky printer into a reliable tool that works exactly the way you intended.
Key Takeaways
- Learn to distinguish between slicer settings and physical wear so you can stop chasing ghost issues and start fixing your hardware.
- Discover how to solve common 3d printer problems by matching specific failure symptoms to the right hotends, nozzles, and extrusion components.
- Master first-layer adhesion by choosing the best build surface, from glass to textured PEI, based on your specific material needs.
- Identify early signs of mechanical fatigue in belts and motors before they lead to catastrophic print failures mid-project.
- Build a reliable Canadian maintenance kit with essential spares to ensure you never have to pause your creative workflow while waiting on shipping.
Diagnosing Machine Failures: Matching Problems to Parts
Before you dive into your slicer settings to fix a ghosting issue, take a step back and look at the frame. Many common 3d printer problems that appear to be software glitches are actually physical cries for help from your machine. Ever since the early days of the RepRap project, makers have balanced the line between digital precision and mechanical reality. If your printer was working yesterday but failing today with the same file, your hardware is likely the culprit.
Mechanical fatigue is a silent thief of print quality. Check your belts for fraying or black "dust" near the pulleys; this is a clear sign of improper tension or misalignment. Listen for rhythmic grinding in your bearings or feel for flat spots on your V-slot rollers. These components are consumables, not permanent fixtures. Settling for "good enough" generic parts might save a few dollars now, but low-quality clones often lack the tight tolerances needed for high-speed printing. This leads to more frequent failures and more wasted filament in the long run.
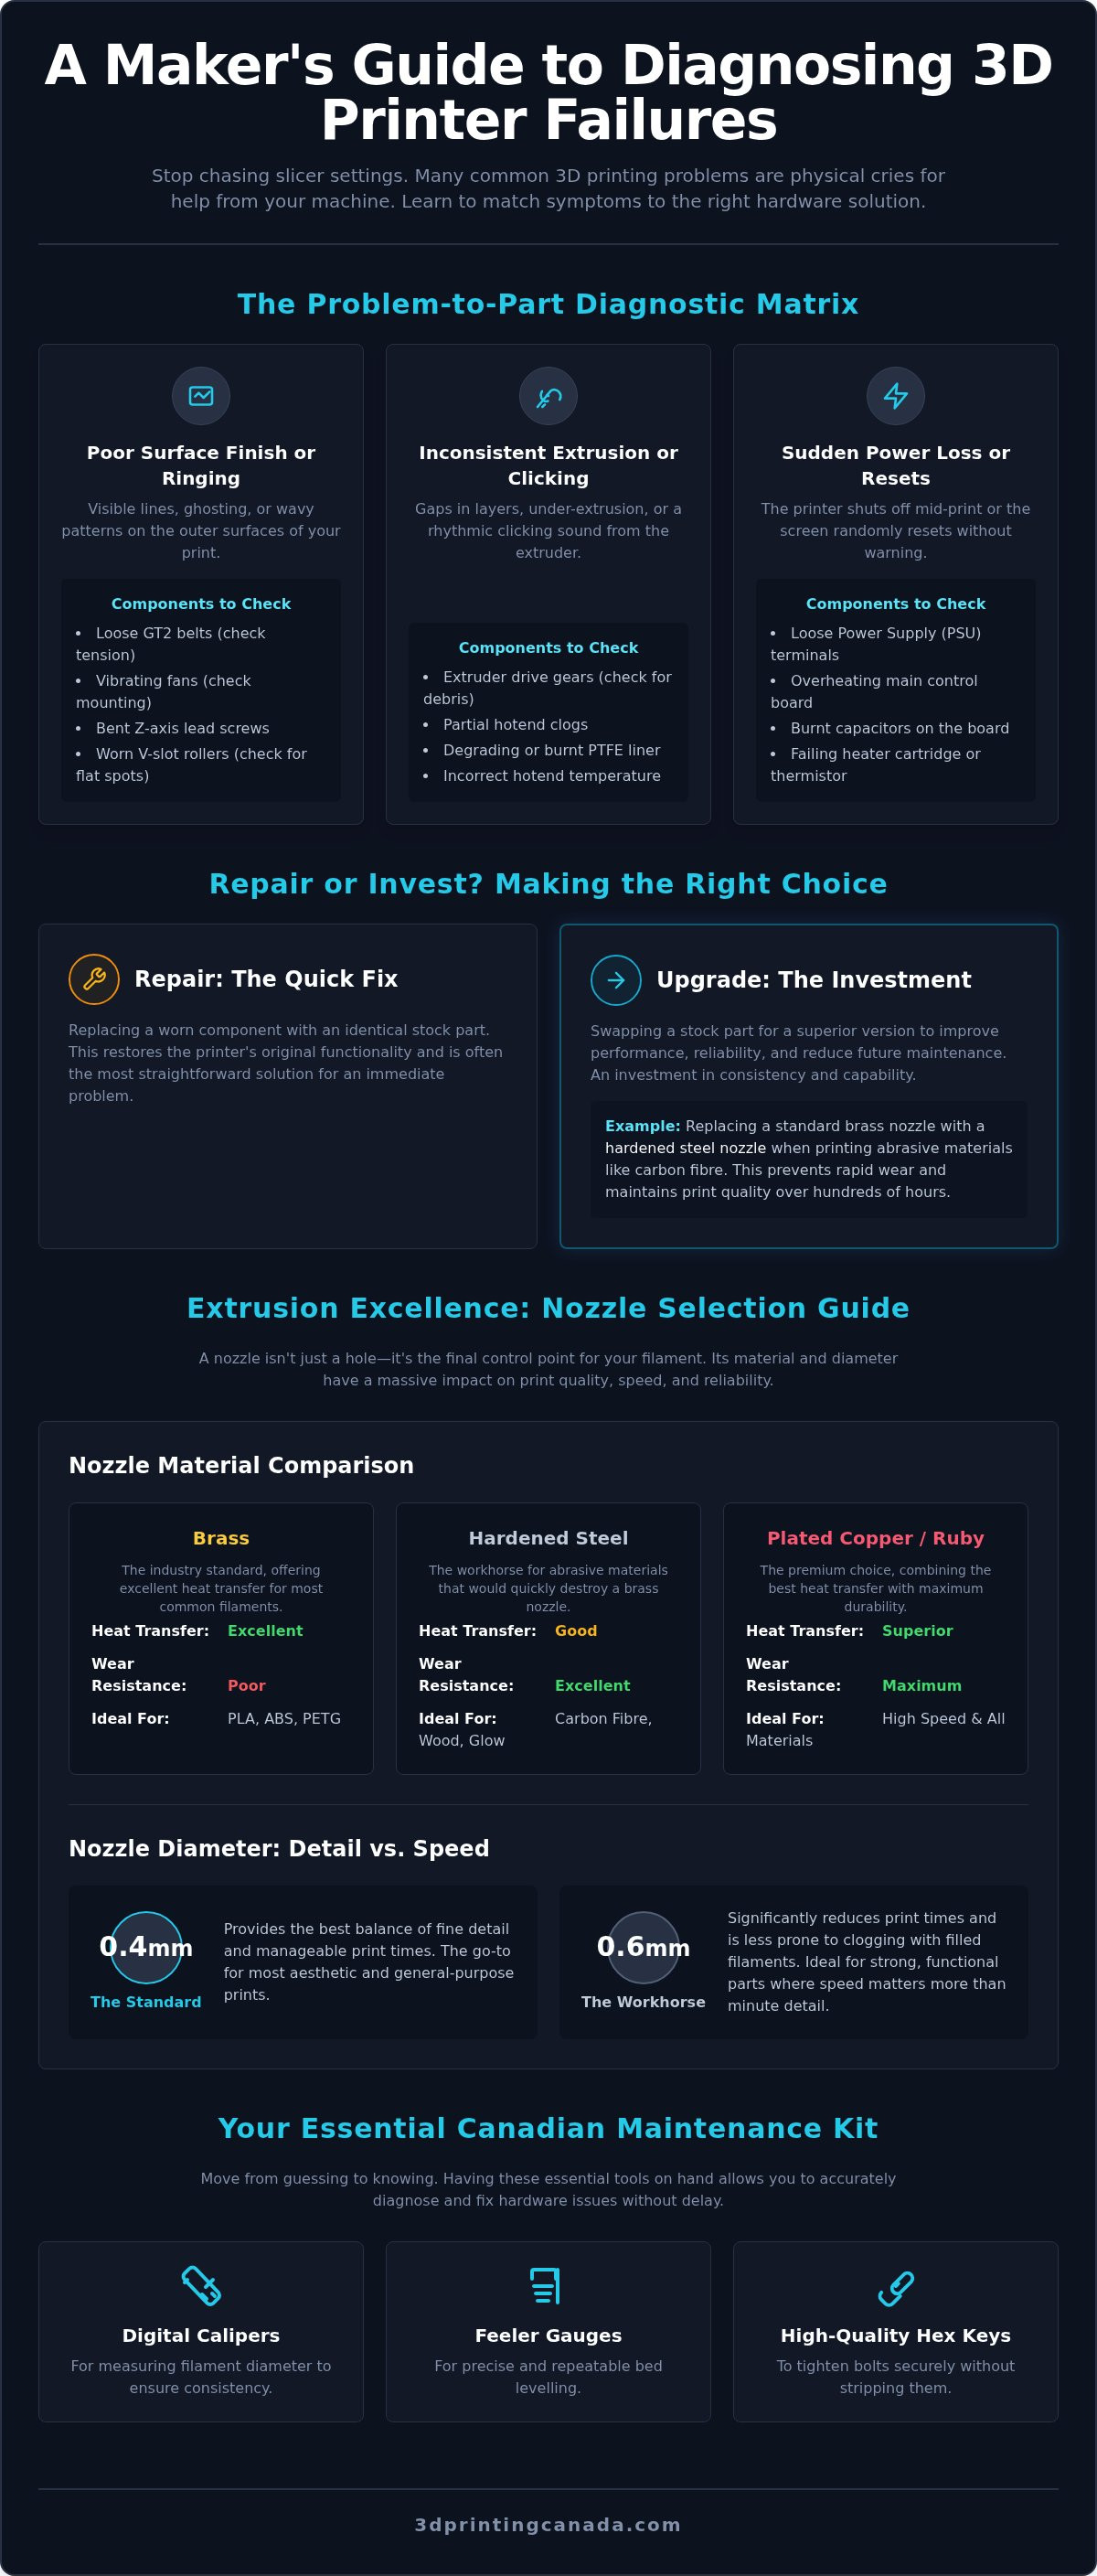
Every Canadian maker should keep a basic diagnostic kit at their workstation. This includes digital calipers for measuring filament diameter, a set of feeler gauges for precise bed leveling, and a high-quality hex key set that won't strip your bolts. Having these tools ready helps you move from guessing to knowing exactly which part needs attention.
The Problem-to-Part Matrix
Use this quick reference to narrow down your search for replacement parts when things go wrong:
- Poor surface finish or ringing: Check for loose GT2 belts, vibrating fans, or bent Z-axis lead screws.
- Inconsistent extrusion or clicking sounds: Inspect your extruder drive gears for debris and check your hotend for partial clogs or a degrading PTFE liner.
- Sudden power loss or random resets: Inspect the PSU terminals for loose connections and check the control board for signs of overheating or burnt capacitors.
When to Repair vs. When to Upgrade
Replacing a part with an identical stock component is a repair. Swapping it for a superior version is an investment in your future success. For example, choosing high-quality Bambu Lab accessories Canada isn't just about flashy new features; it's about reducing your maintenance cycles. Hardened steel nozzles and high-performance build surfaces have a much longer "end-of-life" than their brass or sticker-based counterparts. If you're replacing the same brass nozzle every month because you're printing abrasive filaments, it's time to upgrade to a wear-resistant alternative that can handle the heat.
Extrusion Woes: Selecting Hotends and Nozzles
Many makers assume a clogged nozzle just needs a quick poke with a cleaning needle. While that might clear a temporary blockage, it won't fix internal scoring or a worn-out tip. One of the most common 3d printer problems is inconsistent extrusion caused by a nozzle that has physically changed shape. If you've been printing with "tough" materials like carbon fibre, wood-fill, or glow-in-the-dark filaments, your standard brass nozzle can be ruined in just a few hundred grams of material. Once the internal geometry is scratched, filament won't flow predictably, leading to stringing and surface blobs that no slicer setting can fix.
Your extrusion system relies on a delicate balance of heat and pressure. If your temperature graph looks like a roller coaster, your heater cartridge or thermistor might be failing. A loose thermistor sends incorrect data to the control board, causing the heater to overcompensate. This instability leads to "heat creep," where the filament melts too early in the cooling block and creates a stubborn jam. Upgrading these small electronic components is often the cheapest way to restore professional-grade reliability to an aging machine.
Nozzle Materials: Brass, Steel, and Ruby
Brass is the gold standard for thermal conductivity, but it's incredibly soft. For abrasive materials, you must switch to hardened steel or a ruby-tipped nozzle to maintain a consistent aperture. If you want the best of both worlds, plated copper nozzles offer the superior heat performance of brass with a much tougher surface finish. Diameter choice is equally important for your project goals:
- 0.4mm Nozzle: The industry standard for a reason. It provides the best balance of fine detail and manageable print times.
- 0.6mm Nozzle: The sweet spot for speed. It's less prone to clogs when using filled filaments and significantly reduces the number of walls needed for structural parts.
Hotend Assembly Upgrades
Stock hotends often use a PTFE-lined heat break. These are reliable for PLA, but the plastic liner begins to degrade and release fumes once you cross 240°C. Upgrading to an all-metal hotend or a bi-metal heat break allows you to safely print PETG, Nylon, and ASA. Industry leaders like E3D and Micro Swiss have designed drop-in replacements for many Creality and Bambu Lab machines, making the transition to high-temperature printing straightforward. If you're ready to stop fighting with clogs and start printing advanced materials, you can explore our full range of hotends and nozzles to find the perfect fit for your setup.
First Layer Failure: Build Plates and Bed Adhesion
The first layer is the foundation of every successful project. When it fails, the entire print is usually a write-off. While many guides focus on software offsets, physical degradation of the build surface is one of the most common 3d printer problems encountered in Canadian workshops. If your filament has stopped grabbing the plate despite a perfect level, your build surface might simply be at the end of its life. PEI sheets are incredible, but they aren't permanent. Over time, the microscopic pores that grip the molten plastic become clogged with oils or smoothed out by repeated use.
Choosing between glass and spring steel depends on your specific needs. Borosilicate glass provides a perfectly flat surface, which is ideal for machines with uneven heated beds. However, spring steel plates with magnetic bases have become the industry favourite for their sheer convenience. Being able to remove a finished print by simply flexing the plate saves time and prevents you from damaging the machine by prying at it with a scraper. If you find your bed won't stay level, consider replacing the stock yellow springs with high-quality silicone spacers. These provide much higher tension and hold your leveling knobs in place far longer than standard hardware.
Comparing Build Surfaces
Your choice of texture changes how you interact with different materials. Textured PEI is the king of PETG and TPU, providing enough grip to hold the print but allowing it to release once cool without a struggle. Smooth PEI, on the other hand, gives you that mirror-like finish on the bottom of your parts. Don't forget the role of adhesives like glue sticks or specialized bed sprays. While some purists avoid them, they act as a vital release agent for materials like PETG, which can otherwise bond too strongly and tear chunks out of your glass or PEI surface.
Bed Leveling Hardware
Consistency is key to a reliable workshop. Upgrading to high-tension springs or a dedicated touch sensor can eliminate the need for constant manual adjustments. If you're dealing with a severely warped bed that software compensation can't fix, it might indicate a deeper mechanical issue with the Y-axis carriage or the heating element itself. In these cases, reaching out to professional 3D printer repair services Canada can help you determine if the frame needs straightening or if the hardware requires a total replacement.
Mechanical Precision: Belts, Motors, and Electronics
While a clean nozzle and a level bed are vital, they can't compensate for a sloppy motion system. Mechanical precision is the backbone of every high-quality part. If you notice "ghosting" or "ringing" on your prints, it's often a sign that your belts have lost their tension. Identifying these common 3d printer problems early saves you from the frustration of a snapped belt mid-print. Look for visible fraying or black rubber dust near the pulleys; these are the tell-tale signs that your GT2 belts are nearing the end of their lifespan.
Upgrading the "brain" of your machine is another way to achieve professional results. Modern control boards offer silent stepper motor drivers, which replace the high-pitched whine of older machines with near-silent operation. Beyond noise reduction, these drivers provide smoother current to your motors, resulting in fewer artifacts on your print surfaces. If you want to push your machine to its limits, investing in high-quality motion components is the only way to maintain accuracy at high speeds.
Motion System Components
Standard rubber belts often stretch under the high tension required for fast moves. Selecting genuine Gates GT2 belts ensures zero-stretch reliability, which is a massive upgrade over generic OEM options. For those building or maintaining a fast 3D printer Canada enthusiasts recommend, swapping out worn V-slot rollers for linear rails is a game-changer. Linear rails offer superior rigidity and reduce the maintenance headache of constantly adjusting eccentric nuts to fix Z-wobble or carriage play. Don't forget lead screw maintenance; sometimes a simple cleaning and lubrication do more for Z-axis consistency than any software fix.
Fans and Cooling Solutions
Fans are the hardest working electronic components on your machine, making them the most frequent point of failure. A failing part-cooling fan leads to poor overhangs and messy bridges, while a dead mainboard fan can cause your drivers to overheat and crash the entire system. Upgrading to dual ball-bearing fans significantly increases longevity compared to cheap sleeve-bearing alternatives. These fans stay quieter for longer and provide the consistent airflow needed to keep your electronics and your prints cool. If your machine is starting to sound like a jet engine or losing steps due to heat, it's time to browse our selection of high-performance mechanical parts and electronics to get back to peak precision.
Essential Spares: Building Your Canadian Maintenance Kit
Nothing kills a creative weekend faster than a snapped thermistor wire during a routine cleaning. If you're in the middle of a deadline, waiting for a replacement part to cross the border isn't just an inconvenience; it's a project killer. Building a dedicated maintenance kit is the best way to handle common 3d printer problems before they turn into days of downtime. We've seen it countless times: a maker spends more on express shipping for a single five-dollar component than the part itself is worth. By keeping a small inventory of high-wear items, you're essentially buying insurance for your productivity.
Your "parts bin" doesn't need to be a warehouse. Focus on the small, high-stress components that take the most heat and movement. Organize these in a simple tackle box or a set of 3D-printed drawers so you aren't digging through a junk pile when a fan stops spinning. This proactive approach turns a potential disaster into a ten-minute pit stop. It's about being prepared so that your workshop remains a place of creation rather than a centre of frustration.
The "Must-Have" Spare Parts List
While every machine is different, certain components fail with predictable regularity. Ensure your kit includes these essentials to stay ahead of the curve:
- Extrusion Spares: Keep at least three extra nozzles (0.4mm and 0.6mm), two thermistors, and a spare heater cartridge. These are the front-line soldiers of your printer.
- Tubing and Fittings: Spare PTFE tubing and a handful of pneumatic fittings are vital, especially if you're frequently swapping filaments.
- Hardware Essentials: A variety pack of M3 screws, nuts, and GT2 belt clips will save you from a trip to the hardware store for a single lost fastener.
- Limit Switches: These small mechanical sensors can wear out or get bumped, so having a spare on hand is a smart move.
Buying with Confidence in Canada
Sourcing your parts from a specialized Canadian retailer means you get components that have been vetted for quality and compatibility. We carry a massive selection that includes 1254 specific parts, ensuring you can find exactly what you need for your specific model. Whether you're looking for official Bambu Lab accessories, Creality spares, or high-end BigTreeTech control boards, our detailed product descriptions help you verify fitment before you buy. This eliminates the fear of receiving low-quality clones that fail after just a few hours of use.
Don't let a minor hardware failure hold back your next big idea. Take control of your machine's uptime by stocking your workshop with reliable, high-performance components today. Browse our full collection of 1, 200+ 3D printer parts to build your ultimate maintenance kit and keep your prints running smoothly.
Master Your Machine and Restore Peak Performance
Mastering your 3D printer is a journey of moving from frustration to complete mechanical control. You've learned that most common 3d printer problems are actually physical symptoms of wear that require the right replacement part. By choosing high-quality components like hardened steel nozzles or silent motor drivers, you don't just fix a failure; you upgrade your machine's entire potential. This proactive approach prevents future clogs and adhesion issues before they have a chance to stall your creative workflow.
Sourcing these components shouldn't be a gamble. As an authorized reseller for industry leaders like Bambu Lab, Creality, and E3D, we maintain the largest selection of maintenance items in Canada. With 1254 specific parts in stock and fast national shipping on all kits, we provide the reliable support you need to keep printing with confidence. Stop letting hardware failures dictate your schedule. Shop 1, 200+ Professional 3D Printer Parts & Upgrades today to restore your machine to its best. Your next successful project is just one reliable component away.
Frequently Asked Questions
How do I know if my 3D printer nozzle needs to be replaced?
Replace your nozzle if you notice inconsistent extrusion widths or scarring on your top layers. A worn nozzle tip often becomes rounded or the aperture expands, which ruins your slicer's flow calculations and causes stringing. If you've printed a few spools of abrasive materials like glow-in-the-dark or carbon-fibre filament, your brass nozzle is likely already out of spec. Inspect the tip under a magnifying glass to see if the flat surface has been ground down.
Are all 3D printer parts universal, or do I need brand-specific components?
It's a mix. While fasteners, certain bearings, and GT2 belts are standard across the industry, most critical components like hotends, thermistors, and fans are model-specific. Even within a single brand, a part for one model might not fit another. We provide detailed compatibility lists for our collection of over 1200 parts to help you find the exact match for your machine, whether you're using a Creality or a Bambu Lab printer.
What is the most common hardware part that fails on a 3D printer?
The nozzle is the most frequent hardware failure because it's a consumable that deals with constant heat and friction. Beyond the nozzle, cooling fans often fail due to dust or bearing wear, leading to some of the most common 3d printer problems like heat creep. Belts and V-slot rollers also wear down over time, especially in high-volume workshops that run machines 24/7. Keeping these specific spares on hand is essential for maintaining uptime.
Can I upgrade my 3D printer parts to make it print faster?
You can definitely increase your speed by upgrading to a high-flow hotend and a more powerful extruder. These parts allow your machine to melt and push filament faster without losing steps. For the best results, combine these with a rigid motion system like linear rails and a modern 32-bit control board. These upgrades help maintain accuracy even when the print head is moving at several hundred millimetres per second during rapid travel moves.
Is it worth repairing an old 3D printer, or should I buy a new one?
Repairing an older machine is often worth it if the frame is sturdy and made of high-quality aluminum extrusions. By swapping out an old control board for a silent one and adding a modern hotend, you can achieve print quality that rivals brand-new machines for a fraction of the cost. However, if the frame is bent or uses outdated proprietary parts that are hard to source, it might be time to consider a new model.
What are the benefits of upgrading to a bi-metal heat break?
Upgrading to a bi-metal heat break is the best way to eliminate heat creep and stubborn jams. These components use two different metals to create a sharp thermal transition, keeping the filament cold until it reaches the heater block. This design allows you to safely print at temperatures above 240°C without damaging a PTFE liner. It's a vital upgrade for anyone looking to print engineering-grade materials like Nylon, ASA, or polycarbonate reliably.
How often should I replace the belts on my 3D printer?
You should replace your belts whenever you see signs of physical degradation like fraying, cracking, or black dust around the pulleys. While high-quality Gates belts can last for thousands of hours, generic rubber belts often stretch or lose their teeth much sooner. Check your belt tension every few weeks to ensure they haven't loosened. If you can no longer get a crisp twang when plucking the belt, it's likely time for a replacement.
Why is my 3D printer bed no longer sticking even after cleaning?
If cleaning with dish soap or isopropyl alcohol doesn't restore adhesion, the microscopic pores of your build plate may be permanently filled or smoothed over. Over hundreds of heat cycles, the PEI coating or glass texture physically degrades and loses its ability to grip molten plastic. This is a sign that the consumable surface has reached its end-of-life. Swapping to a fresh spring steel or glass plate will usually solve the adhesion issue instantly.