
What if the nozzle isn’t the only cause of repeated wood-filament clogs? When a print keeps stopping, it can be hard to tell whether the issue is the filament, hardware or settings. A reliable wood filled filament nozzle clogging prevention routine starts by checking how those factors work together, rather than changing everything at once.
Wood-filled filament can behave differently depending on its blend. Particles may build up in the hotend, while moisture, excessive retraction or unsuitable temperature settings can make flow less consistent. The right setup matters too: nozzle size and material should suit the specific filament and printer. Follow the manufacturers’ recommendations instead of relying on one universal setting.
This guide explains how to identify common causes of blockages, choose a suitable nozzle setup and follow a repeatable workflow before, during and after each print. You’ll learn what to check first, how to adjust settings methodically and when a persistent clog may need more than routine maintenance. A few targeted checks can help you spend less time clearing the nozzle and more time finishing prints.
Key Takeaways
- Learn how wood-derived particles and the filament blend can affect flow, and why identifying the material matters before changing settings.
- Use the filament and printer manufacturers’ guidance to assess nozzle clearance, material, wear and compatibility instead of relying on a one-size-fits-all setup.
- Compare prevention adjustments by their potential benefits, trade-offs and the signs that make them worth trying.
- Build a pre-print checklist that covers filament condition, spool movement, nozzle condition, material profile and first-layer monitoring.
- Follow a safe troubleshooting sequence when a clog persists, and recognize when professional printer repair support may help.
Why wood-filled filament clogs a 3D printer nozzle
Wood-filled filament isn’t simply standard PLA with a wood colour. It combines a polymer base with wood-derived particles, but the polymer, filler type and proportion can vary by product. Check the filament maker’s material information before choosing settings or hardware. Don’t assume every spool labelled “wood” has the same composition or extrusion behaviour.
As the filament passes through the hotend and nozzle, its particles must move through the available flow path along with the softened polymer. Particle size and consistency, nozzle geometry and extrusion conditions all affect how smoothly the material passes through. A mismatch can restrict flow, even if the printer handles ordinary PLA without trouble.
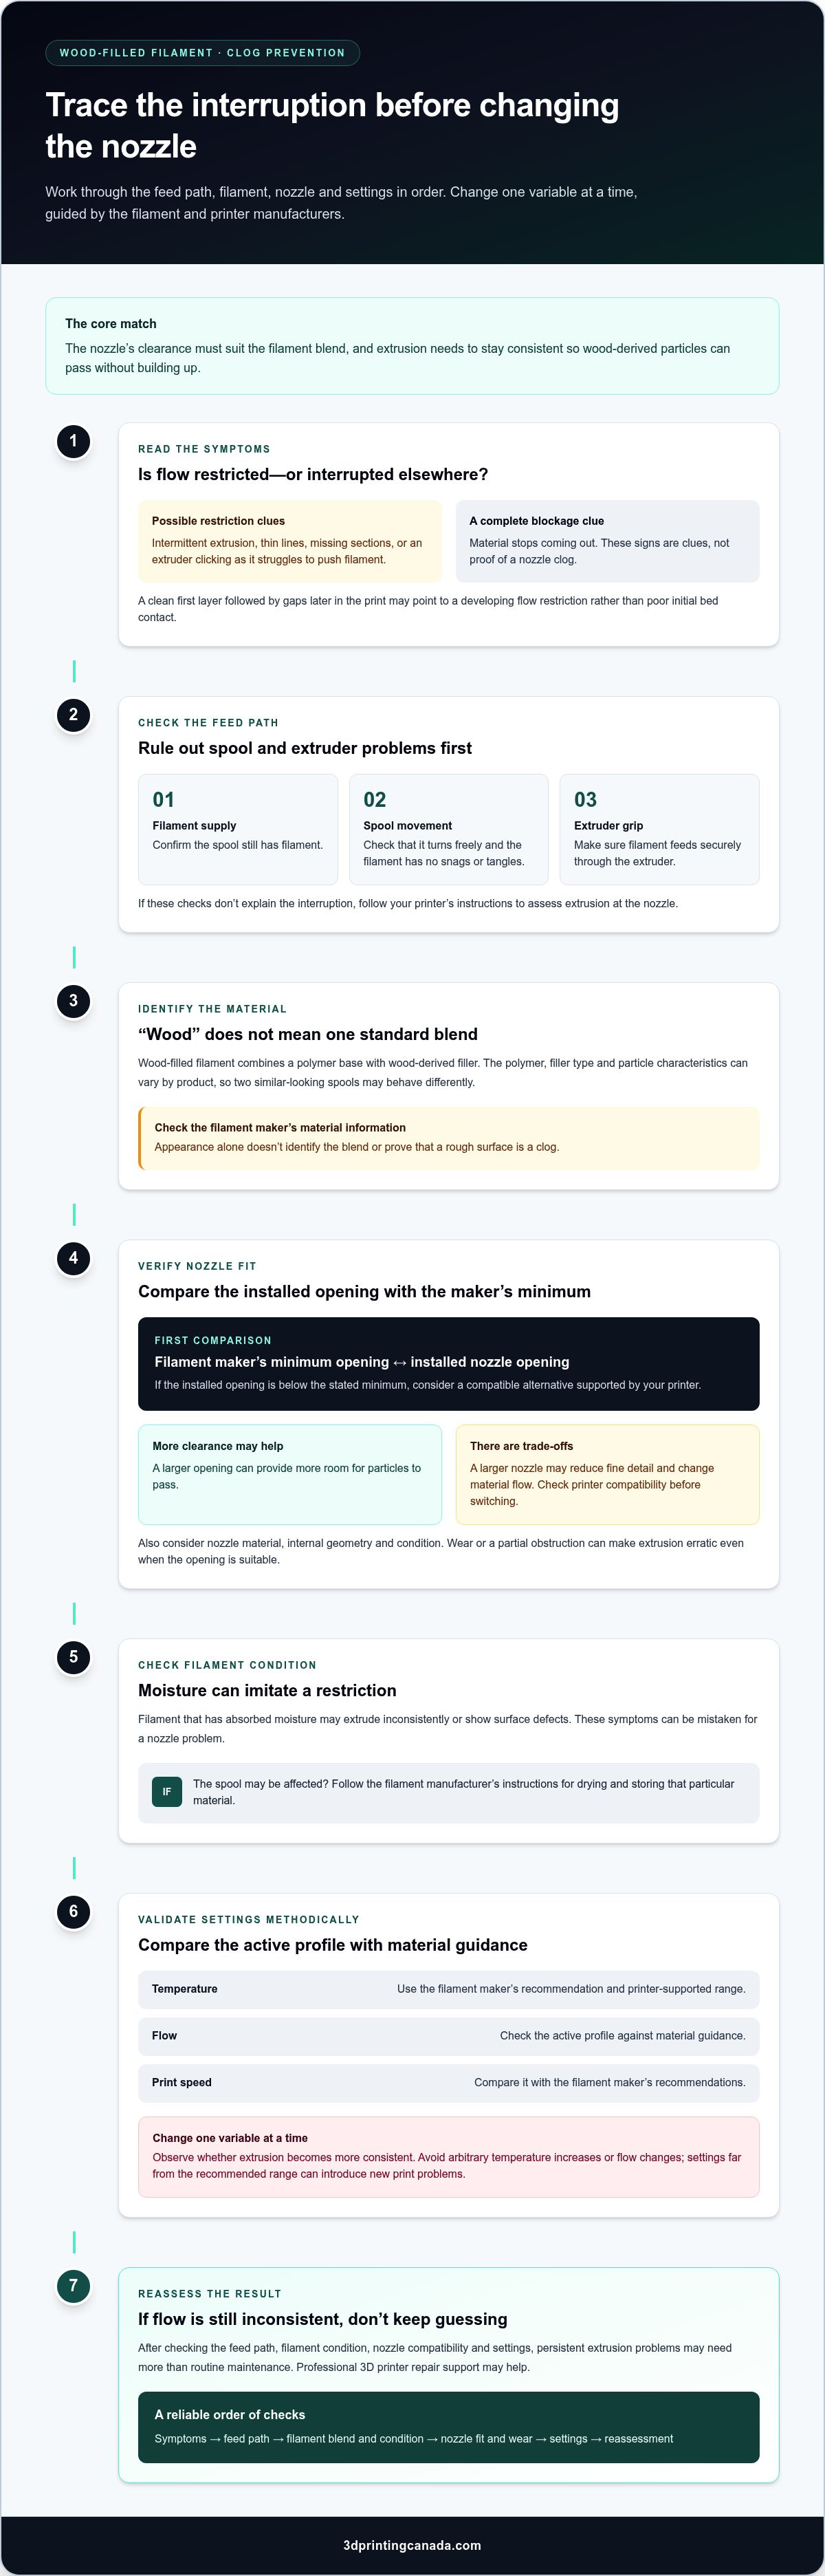
Clog prevention in one sentence: Match the nozzle’s clearance to the filament blend and maintain consistent extrusion so particles can pass through without building up and restricting flow.
What makes wood-filled filament different from standard PLA?
Standard PLA is a polymer, while wood-filled versions combine a polymer base with wood-derived filler. The exact blend and particle characteristics depend on the product. Two filaments can look similarly wood-like yet behave differently in the same printer. Appearance alone doesn’t reveal the cause of a blockage: a rough or uneven surface may indicate a print-quality issue, but it doesn’t prove the nozzle is clogged.
How can you tell a clog from another extrusion problem?
A partial restriction may cause intermittent extrusion, thin lines, missing sections or an extruder that clicks as it struggles to push filament. A complete blockage can stop material from coming out. These signs are clues, not proof. An empty spool, tangled filament or poor grip at the extruder can interrupt flow too.
Check the whole path before blaming the nozzle. Confirm that the spool still has filament and turns freely, look for snags, and check that the filament is feeding securely through the extruder. If those checks don’t explain the interruption, follow your printer’s instructions to assess extrusion at the nozzle. For example, a clean first layer followed by gaps later in the print may point to a developing flow restriction rather than poor initial bed contact.
Good wood filled filament nozzle clogging prevention starts with identifying the right problem. A rough finish calls for print-quality checks; interrupted or absent flow calls for a careful inspection of the feed path and nozzle.
How nozzle clearance, filament condition, and settings affect clogs
A nozzle setup that works well for standard PLA may not suit every wood-filled blend. Match the opening and extrusion path to the filament maker’s guidance while accounting for the printer’s limits. A tight opening can leave less room for particles to pass, but a larger nozzle may affect print detail and flow, and must fit the printer.
How do you choose a nozzle opening for wood-filled filament?
Start with the filament manufacturer’s minimum nozzle-opening recommendation and compare it with the nozzle currently installed. If the current opening is below the stated minimum, consider a compatible alternative supported by your printer. A larger opening can provide more clearance for particles, but may reduce fine detail and change material flow. Check the printer manufacturer’s guidance before changing nozzle size.
Size isn’t the only factor. Nozzle material can influence wear, while internal geometry and condition can affect how consistently filament moves through it. A worn or partially obstructed nozzle may cause erratic extrusion even if its opening is suitable on paper. Use the filament maker’s guidance for material-specific settings, then confirm that your printer supports the nozzle and profile you plan to use.
Can moisture or incorrect settings look like a nozzle clog?
Yes. Filament that has absorbed moisture may extrude inconsistently or produce surface defects, which can be mistaken for a restriction. A temperature, flow or speed setting that doesn’t suit the material can cause similar symptoms. Before changing hardware, check the spool’s condition and compare the active slicer profile with the filament maker’s recommendations.
Follow the manufacturer’s instructions for drying and storing that particular filament. Then compare temperature, flow and print speed with the material guidance and the printer’s supported range. If a setting appears to be the issue, adjust one variable at a time and observe whether extrusion becomes more consistent. Avoid raising temperature or changing flow arbitrarily. Settings far from the recommended range can introduce new print problems.
This step-by-step approach makes wood filled filament nozzle clogging prevention more reliable: check compatibility, inspect the material and validate settings before replacing parts. If extrusion remains inconsistent after these checks, persistent printer issues may benefit from professional 3D printer repair services.
Which wood-filled filament clog-prevention changes should you try first?
Start with the simplest checks before changing hardware. Confirm that the selected material profile matches the filament, inspect the spool for tangles or signs of poor storage, and compare your nozzle setup with the filament and printer manufacturers’ guidance. Recommendations depend on the specific filament formulation and printer specifications, so treat each adjustment as a test rather than a universal fix.
Should you change the nozzle or adjust settings first?
Check the documentation first. If the nozzle opening falls below the filament maker’s recommendation and your printer supports a suitable alternative, a nozzle change may be worth considering. A wider opening can improve particle clearance, but may reduce fine detail or alter material flow. If the nozzle setup meets the guidance, check the profile and spool condition before swapping parts. A nozzle change alone won’t solve every extrusion problem.
What are the trade-offs between common prevention options?
Choose a change based on evidence, then assess the result before moving on to the next one. Routine care can lower the chance of a repeat issue, but it won’t necessarily clear a blockage that has already formed.
| Change to try | Likely benefit | Trade-off | Evidence it may help |
|---|---|---|---|
| Nozzle opening | More clearance for particles in the blend. | May reduce fine detail; the nozzle must fit the printer. | The installed opening is smaller than the filament maker’s minimum guidance, or extrusion repeatedly falters with that material. |
| Filament storage | Helps keep the filament in the condition specified by its maker. | Good storage won’t remove a blockage that already exists. | The spool has been left exposed, or extrusion and surface quality vary between prints. |
| Material profile | Aligns temperature, flow and speed with the filament’s requirements. | Changing several settings together makes results harder to diagnose. | The selected profile is for a different material, or settings don’t match the maker’s recommendations. |
| Nozzle cleaning | Can remove residue before it builds into a larger restriction. | Takes time and must follow the printer’s safe maintenance procedure. | Flow remains uneven after checking the spool and profile, or residue is visible during a permitted inspection. |
Keep a simple note of each adjustment and its result. For wood filled filament nozzle clogging prevention, that record helps distinguish a real improvement from a coincidental change and points to the next check without resetting the whole setup.
How to prevent wood-filled filament nozzle clogs before every print
A consistent pre-print routine helps catch feed and setup problems before they interrupt a longer job. Work through these checks in order, especially after changing filament, nozzle hardware or material settings. Follow your printer’s instructions for loading and maintenance throughout.
- Confirm material and printer compatibility. Check the filament label and manufacturer’s guidance for the material type, recommended settings and nozzle requirements. Make sure the printer and installed hardware support the setup you plan to use.
- Inspect the spool and filament. Look for tangled, damaged or brittle sections, and consider whether the filament has been stored as its manufacturer recommends. Check that it feeds freely rather than catching on the spool or guide.
- Check spool movement. Turn the spool by hand, if accessible, and confirm it can unwind without snagging or excessive resistance. A feed problem can mimic a nozzle restriction, so resolve any tangles before printing.
- Inspect the nozzle and extrusion path safely. Look for visible residue or signs of damage, and use the printer maker’s documented maintenance procedure. Don’t probe or disassemble components in a way the manufacturer advises against.
- Select the right material profile. Confirm the slicer profile matches the filament and compare its temperature, flow and speed settings with the material guidance. Don’t assume a standard PLA profile is suitable.
- Load and test extrusion. Use the printer’s documented loading process, then check that filament extrudes steadily. If you’ve changed the material profile or hardware, run a short, low-risk test print before starting a long job.
- Watch the first layers. Look for consistent lines and continuous material flow. Pause to investigate if extrusion becomes intermittent, lines thin out or sections are missing, rather than letting a long print continue with a possible feed problem.
Keep notes when tuning. Change one setting at a time and record what you changed and how the test behaved. That makes your wood filled filament nozzle clogging prevention routine easier to repeat and troubleshoot.
For a new setup, the available 3D printing materials and equipment include filaments, printers and accessories.
What to do when wood-filled filament still clogs
If extrusion stops or becomes uneven, pause the print rather than letting the extruder continue pushing against a blockage. A persistent clog is frustrating, but forcing filament through or rushing into disassembly may damage components. Follow a safe, documented check before deciding whether the issue needs technical diagnosis.
How can you clear a blockage without causing damage?
Use only the printer manufacturer’s instructions for unloading filament and cleaning the nozzle. Procedures differ by printer, so don’t assume a method that worked on another machine is appropriate for yours. If the procedure requires handling the hotend or nozzle, follow its temperature and cooling directions carefully. Allow hot components to cool before touching them when instructed.
Next, inspect the accessible filament path for a tangle, snag or feed issue. If the manufacturer’s procedure permits an extrusion test, try it and observe whether material flows steadily. Avoid forceful probing, and stop if clearing the path would require unfamiliar nozzle, hotend or extruder disassembly. Following the documented procedure is safer than escalating by force.
When is it time to get printer repair support?
Consider technical diagnosis if blockages keep returning despite using compatible filament, following its material guidance and completing the printer’s documented maintenance steps. Repeated interruptions can point to a persistent hardware or extrusion issue that routine cleaning may not resolve. Note what you observed, which checks you completed and whether the problem occurs with different material profiles. Those details can help guide further troubleshooting.
For ongoing extrusion or hardware problems, professional 3D printer repair services can help with diagnosis and repair. If you use a Bambu Lab printer and are considering a compatible hardware change, review Bambu Lab accessories and parts alongside your printer’s specifications before making a change.
Good wood filled filament nozzle clogging prevention includes knowing when to stop troubleshooting. Follow the manufacturer’s maintenance guidance and use repair support when the same extrusion fault persists.
Make your next wood-filament print more predictable
Reliable wood filled filament nozzle clogging prevention comes down to a few repeatable habits: match the nozzle and material profile to the filament maker’s instructions, check the spool and extrusion path before printing, and test changes with a short print before committing to a longer job. If a blockage returns, follow your printer’s documented cleaning steps and avoid forcing parts that need careful handling.
Keep a note of the settings and checks that work with your specific filament and printer. That record makes it easier to spot patterns, narrow down the cause of a new extrusion problem and get back to creating with less guesswork.
3D Printing Canada sells 3D printing filaments, printers, scanners and accessories, and provides professional 3D printer repair services. Explore 3D printing materials and equipment for your next project.
Frequently Asked Questions
Is a larger nozzle better for wood-filled filament?
A larger nozzle opening can provide more clearance for particle-filled material and may reduce blockage risk, but it isn’t automatically right for every filament or printer. Check the material maker’s minimum nozzle guidance and your printer’s specifications before changing hardware. A wider opening can affect fine details, so consider the level of detail your model needs. Test the setup with a small print before starting a larger project.
Can wood-filled filament clog a 0.4 mm nozzle?
Yes, wood-filled filament can clog a 0.4 mm nozzle, depending on the blend, particle characteristics, nozzle condition and extrusion setup. That doesn’t mean every 0.4 mm nozzle will clog. Some filament makers may recommend a larger opening for their material. Check the instructions for the exact filament and printer, and review compatibility and setup if flow interruptions recur rather than assuming nozzle size is the only cause.
How do you stop wood-filled filament from clogging?
Start by confirming that the filament and nozzle are compatible with your printer, then follow the material maker’s storage and printing guidance. Check the nozzle and feed path, select a suitable material profile, and test for steady extrusion with a short print. Change one setting at a time so you can tell what helps. A consistent wood filled filament nozzle clogging prevention routine also means investigating recurring blockages instead of raising settings blindly.
Does wood-filled filament need a hardened steel nozzle?
Not every wood-filled filament calls for the same nozzle material. Filler composition and manufacturer recommendations vary, while nozzle material can affect wear and heat transfer. Check the filament and printer documentation before replacing a nozzle, and make sure the part is compatible with your specific printer. If the nozzle maker specifies changes to temperature or flow for that material, follow that guidance and test the setup before a longer print.
Can wet wood-filled filament cause nozzle clogging?
Moisture can contribute to inconsistent extrusion or surface defects that resemble a nozzle blockage, but it doesn’t prove the nozzle is clogged. Follow the filament manufacturer’s drying instructions and store the spool as directed. If extrusion remains uneven after addressing filament condition, inspect the nozzle and feed path using the printer’s maintenance guidance. Check possible causes systematically rather than treating one symptom as a definite diagnosis.
What should I do if wood-filled filament keeps clogging?
Pause printing and follow your printer maker’s documented steps to inspect the nozzle, filament path and extruder. Confirm that the material and nozzle are compatible, then test with a short print after any adjustment. Don’t force tools into hotend components or attempt unfamiliar disassembly. If the same blockage continues after routine checks, professional 3D printer repair support can help diagnose persistent hardware or extrusion problems.
Can I use wood-filled filament in any 3D printer?
No, compatibility depends on both the printer and the specific wood-filled filament. Check the printer’s supported materials, nozzle configuration and hotend limits alongside the filament maker’s requirements before loading it. Some setups may need a different nozzle opening or a material-specific profile. If the printer and filament guidance indicate compatibility, start with a short test print to check extrusion before committing to a long or detailed job.